
Thinking about going solar but have a tile roof?
You’re not alone — many homeowners in Australia and Southeast Asia love their concrete or clay tile roofs. They’re beautiful, long-lasting, and often outlive the solar panels themselves. But how exactly do you install solar panels on such a roof without causing leaks or damage?
The answer lies in using the right solar tile roof hooks and a proven mounting system.
At XIAMEN PV MOUNTS TECHNOLOGY CO., LTD., we specialize in durable, corrosion-resistant, and easy-to-install solar roof mounting solutions designed precisely for tile roofs — giving you long-term peace of mind and maximum power output.
Why Tile Roofs Are Ideal for Solar Panel Installation
Tile roofs and solar panels are a perfect pair. A well-installed tile roof can last over 100 years, while most solar panels are rated for 25 سنة or more. This means you can confidently install solar panels knowing your roof will remain structurally sound for decades.
With PV Mounts’ tile roof solar mounting systems, your panels sit seamlessly above the tiles without compromising the roof’s waterproofing. The result? A clean, professional look that protects your home while generating renewable energy.
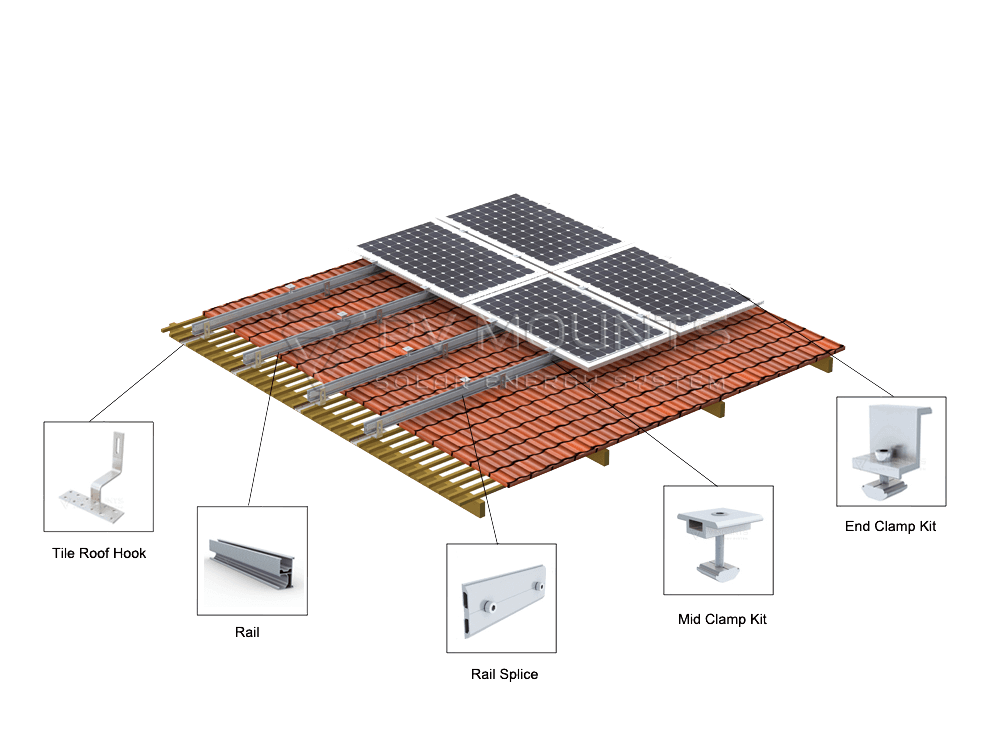
What You’ll Need Before Starting
| Tools | PV Mounts Components |
|---|---|
| Electric drill & torque wrench | Stainless steel tile roof hooks |
| Socket wrench | Aluminum mounting rails and rail splices |
| Measuring tape & chalk line | Mid clamps & end clamps |
| Safety gear | Grounding lugs & pvm-nut kit |
💡 Pro Tip: PV Mounts’ hooks and rails are made from SUS304 stainless steel and high-grade aluminum, ensuring long-term corrosion resistance, especially for coastal or tropical climates. SUS430 is available as well.

Step 1: Mark and Prepare Hook Locations
Before drilling or lifting tiles, mark out the exact hook positions according to your project’s construction drawing.
- L1 should be about half the length of the solar panel.
- L2 should match the spacing between hooks as specified.
- Ensure all hooks align both horizontally and vertically to maintain a level installation.
This step is key to distributing weight evenly and preventing stress on any single tile.

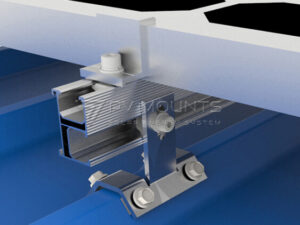
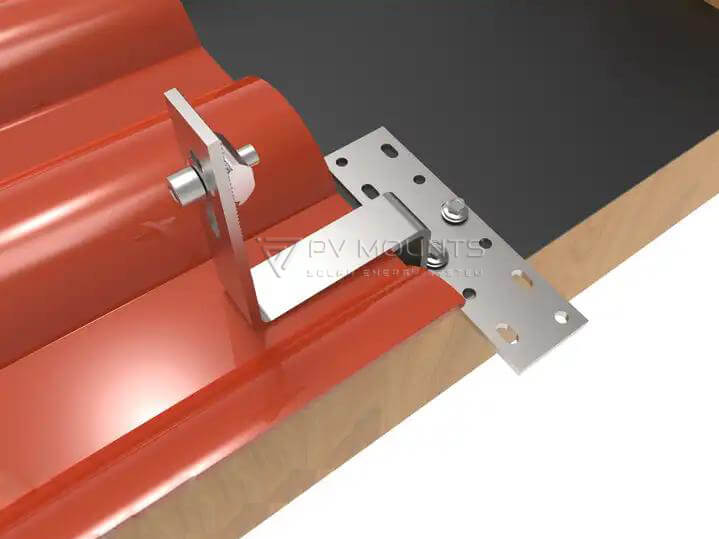
Step 2: Install the PV Mounts Tile Roof Hooks
Carefully lift the tiles where hooks will be placed. Position the stainless steel tile roof hook directly over the roof rafter or purlin for maximum strength.
Secure the hook using براغي ذاتية التثبيت. PV Mounts hooks are engineered with an optimized base plate design to minimize roof penetration while maintaining stability.
Once fixed, gently return the tiles to their original position, allowing the hook arm to extend cleanly through the gap.
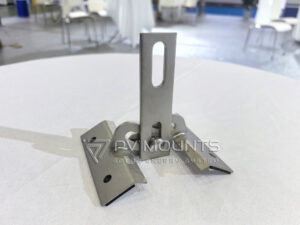
Tip: PV Mounts offers different hook models for flat, curved, and slate tiles, ensuring perfect compatibility with any tile roof type.
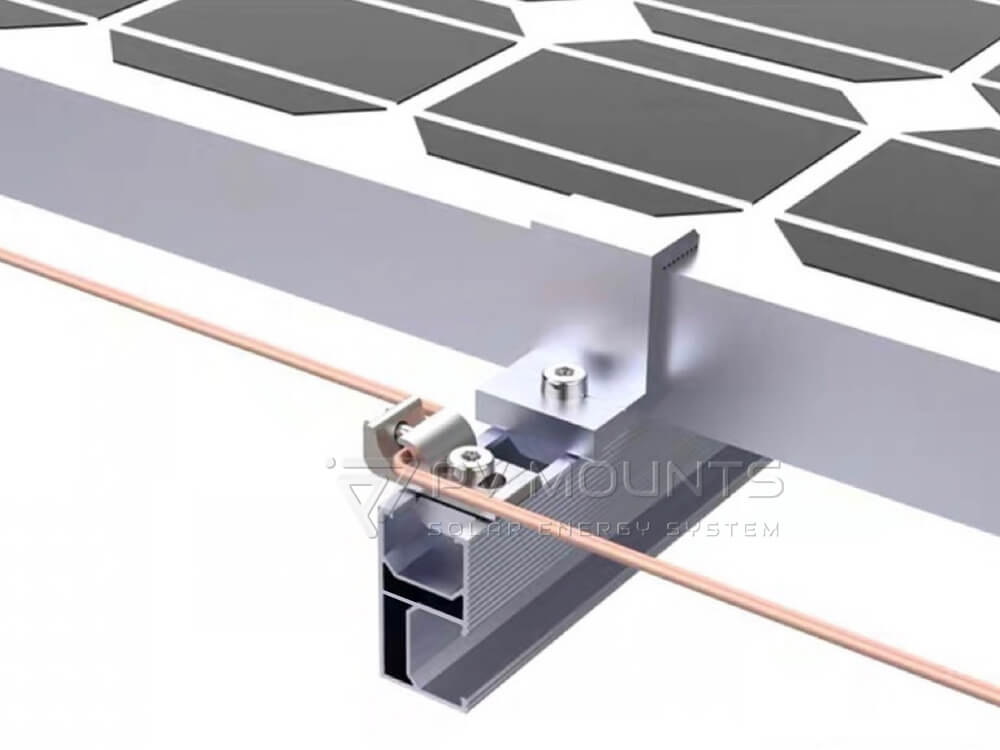
Step 3: Fix the Mounting Rails
Attach the aluminum rails onto the installed hooks using a pvm-nut kit. If a single rail isn’t long enough, connect two rails with a rail splice:
- Insert half of the splice into the first rail and tighten with an M8x12 hex bolt.
- Insert the other half into the second rail and fasten securely.
- Verify the entire rail line is level and properly supported.
This creates a rigid, weather-resistant structure that will hold your solar panels firmly even under strong winds.

Step 4: Mount the Solar Panels
Now comes the exciting part — placing the panels!
Start installing from the bottom left corner, moving left to right و bottom to top.
- Use mid clamps between each panel.
- Use end clamps at both ends of the array.
- Attach grounding washers under each mid clamp and grounding lugs at each string end for electrical safety.
Make sure all clamps are tightened evenly with the correct torque — not too loose, not too tight.


Step 5: Grounding and Final Connections
Install grounding lugs to connect all panels electrically to the system ground. Follow your inverter manufacturer’s wiring instructions carefully.
If you’re not a certified installer, it’s best to have a professional electrician complete this step. Proper grounding prevents electrical faults and ensures system safety for years to come.
Important Installation Notes
Prevent Bolt “Lock-Up”
When using stainless steel bolts and nuts, friction can cause a condition called “thread galling” or “lock-up.”
To prevent it:
- Clean threads before use.
- Apply a small amount of machine oil or lubricant.
- Tighten slowly and evenly using a torque wrench.
- Avoid using electric wrenches at high speed.
Ensure a Weatherproof Finish
- Check for proper tile replacement after hook installation.
- Apply waterproof sealant if needed.
- Inspect the system for tightness and even load distribution.
PV Mounts’systems are tested to withstand high wind and snow loads, meeting AS/NZS 1170 و ISO standards.
Why Choose PV Mounts for Tile Roof Solar Installation?
| Feature | PV Mounts Advantage |
|---|---|
| المواد | SUS304 stainless steel & anodized aluminum |
| العمر الافتراضي | 25+ years corrosion resistance |
| Compatibility | Works with pantile, plain tile & slate tile roofs |
| Compliance | Meets AS/NZS, ISO, and UL standards |
| Assembly | High pre-assembly reduces installation time |
| الضمان | 10-year product warranty |
With thousands of successful installations across Australia, Southeast Asia, and Europe, الحوامل الكهروضوئية has become a trusted partner for solar EPCs, distributors, and installers worldwide.
الصيانة وطول العمر الافتراضي
Once installed, your tile roof solar system needs little attention.
Here’s what we recommend:
- Clean panels 2–3 times per year for optimal performance.
- Inspect hooks and rails annually for loose fittings or corrosion.
- After heavy rain or storms, check tiles and ensure no debris is trapped beneath panels.
With proper care, your PV Mounts system will continue to perform efficiently for 25 years or more.
الأسئلة الشائعة
Can solar panels be installed on all types of tile roofs?
Yes. PV Mounts offers multiple hook designs that fit curved, flat, or slate tiles securely without breaking them.
Will installing solar panels damage my roof?
No, when installed correctly with PV Mounts systems, the roof remains fully sealed and waterproof.
How long does installation take?
Most residential tile roof installations take 1–3 days, depending on system size.
Do I need to remove all roof tiles?
Only tiles at the mounting points are lifted temporarily — not removed entirely.
Are PV Mounts systems suitable for high-wind areas?
Absolutely. All systems are tested to AS/NZS 1170 standards for wind and snow loads, making them ideal for coastal or cyclone-prone regions.
How long do PV Mounts components last?
All our stainless steel and aluminum components have a عمر افتراضي يبلغ 25 عاماً with a ضمان لمدة 10 سنوات.
Conclusion: Build a Roof-Strong Solar Future
Installing solar panels on a tile roof isn’t complicated when you have the right mounting system and a reliable partner.
With PV Mounts’ tile roof mounting solutions, you get strength, simplicity, and long-term peace of mind — no cracked tiles, no leaks, just solid performance year after year.
Take the next step toward a sustainable future — contact XIAMEN PV MOUNTS TECHNOLOGY CO., LTD. for expert guidance or product support for your next tile roof solar project.
internal link: Explore PV Mounts Tile Roof Mounting Systems →
outbound link:Clean Energy Council – Solar Installation Guidelines →
Watch the Installation Video
🎥 For step-by-step visual guidance, check out PVMOUNTS’ comprehensive video tutorial on how to install solar panels on a tile roof.