
Clay tile roofs are one of the most common residential roofing types across Europe.
Installing solar panels on clay tile roofs requires careful structural anchoring and waterproof protection. Unlike metal roofs, tile systems require partial tile removal and proper hook positioning to avoid cracking and leakage.
This step-by-step guide explains how to install solar panels on clay tile roofs using stainless steel roof hooks in compliance with European best practices.
Why Roof Hooks Are Used for Clay Tile Roofs
On clay tile roofs, solar mounting rails cannot be fixed directly onto tiles.
Instead, solar roof hooks are:
- Anchored into the wooden rafters or structural beams
- Positioned beneath tiles
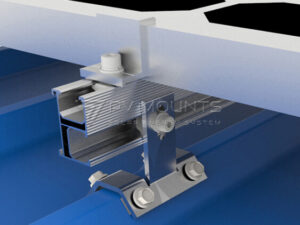
- Designed to support mounting rails above the tile surface
This method ensures:
✔ Proper structural load transfer
✔ Tile integrity
✔ Waterproof safety
✔ Long-term stability under wind and snow loads
For European projects, roof hooks should comply with CE requirements and be designed considering EN 1991 wind and snow loads.
Tools & Materials Required
Before installation, prepare:
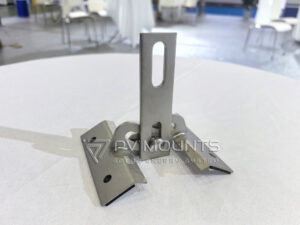
- SUS304 stainless steel solar roof hooks
- Stainless steel wood screws
- Mounting rails
- Mid clamps & end clamps
- EPDM sealing materials (if required)
- Angle grinder (for tile trimming if needed)
- Torque wrench
- Drill and positioning tools
Using corrosion-resistant materials is critical for long-term durability, especially in coastal or humid regions.
Step 1: Locate Rafters and Mark Hook Positions
The first step is to identify the rafter positions beneath the clay tiles.
Roof hooks must be fixed into structural rafters — not only battens.
Spacing depends on:
- Wind load zone (EN 1991-1-4)
- Snow load zone (EN 1991-1-3)
- Rail span design
- Panel size
Typical spacing ranges from 800 mm to 1200 mm depending on load calculation.
Step 2: Carefully Remove or Lift Clay Tiles
Remove the tile at the hook position carefully to avoid cracking.
Clay tiles are brittle. Avoid excessive force.
If necessary:
- Temporarily remove adjacent tiles
- Check underlying waterproof membrane condition
This step ensures safe access to rafters.
Step 3: Fix the Stainless Steel Roof Hook
Position the roof hook base directly over the rafter.
Secure using appropriate stainless steel wood screws.
Important considerations:
- Minimum embedment depth into rafter
- Proper screw torque
- Avoid over-tightening
- Ensure hook alignment
The hook must sit flush and stable before reinstalling tiles.
Step 4: Tile Trimming (If Required)
In some cases, minor tile trimming may be necessary to allow the hook arm to pass without lifting the tile excessively.
Best practice:
- Trim only the underside rib of the tile
- Maintain natural overlap
- Avoid visible surface damage
Improper trimming may cause:
- Tile cracking
- Uneven load distribution
- Water flow obstruction
Step 5: Reinstall Tiles and Check Waterproof Integrity
After fixing the hook:
- Reinstall tiles carefully
- Ensure proper overlap
- Confirm water flow path is unobstructed
- Inspect for gaps
Waterproofing integrity must not be compromised.
European installers prioritize roof warranty preservation — correct hook positioning is essential.
Step 6: Install Mounting Rails
Once all hooks are secured:
- Fix aluminum mounting rails to the hooks
- Use stainless steel bolts
- Check alignment
- Verify horizontal level
Rail spacing must follow structural calculation and panel dimensions.
Step 7: Mount Solar Panels
Finally:
- Position panels
- Secure using mid clamps and end clamps
- Apply correct torque
- Inspect full array stability
At this stage, structural integrity depends on the quality and positioning of the roof hooks.
Engineering Considerations for European Projects
Professional installations must consider:
- Wind uplift forces
- Snow accumulation
- Roof pitch
- Tile type
- Rafter condition
In high wind zones, additional hook density may be required.
Using CE certified, properly engineered roof hooks ensures:
✔ Load safety
✔ Reduced deformation risk
✔ Long-term durability
Common Installation Mistakes to Avoid
❌ Fixing into battens instead of rafters
❌ Using carbon steel screws
❌ Over-tightening fasteners
❌ Excessive tile cutting
❌ Ignoring load calculations
These mistakes can result in:
- Roof leakage
- Structural instability
- Warranty void
- Long-term corrosion
Why Material Quality Matters
For clay tile roofs in Europe, SUS304 stainless steel roof hooks provide:
- Устойчивость к коррозии
- High structural strength
- Compatibility with long service life
- Reduced maintenance risk
Lower-grade materials may reduce initial cost but increase long-term risk.
ЧАСТО ЗАДАВАЕМЫЕ ВОПРОСЫ
Can solar panels be installed without removing clay tiles?
No. Tiles must be partially removed to access rafters for secure anchoring.
Will roof hooks cause leaks?
When properly installed and aligned, roof hooks do not compromise waterproof integrity.
How long does installation take?
Depending on project size, installation typically progresses efficiently once hook positions are properly marked and fixed.
Are CE certified roof hooks required in Europe?
Solar mounting components placed on the EU market must comply with relevant EU directives. Always verify documentation.
Заключение
Installing solar panels on clay tile roofs requires precision, structural understanding, and high-quality components.
The safety and durability of the entire solar system depend heavily on:
✔ Proper rafter anchoring
✔ Waterproof-safe installation
✔ CE compliance
✔ EN 1991 load awareness
✔ Corrosion-resistant stainless steel materials
For European projects, choosing engineered, CE certified solar tile roof hooks ensures structural safety and long-term performance.
If you require installation guidance, structural support, or fast delivery of stainless steel tile roof hooks, contact us for technical assistance and current stock availability.