
Installing solar tile roof hooks correctly is critical for structural safety, waterproofing integrity, and long-term system performance.
In Germany, rooftop PV systems must consider:
- Snow load requirements (EN 1991-1-3)
- Wind uplift resistance
- Tile fragility
- Rafter spacing
- Long-term corrosion exposure
c
Step 1: Identify Tile Type & Roof Structure
Before installation, confirm:
✔ Clay tile or concrete interlocking tile
✔ Tile thickness
✔ Batten spacing
✔ Rafter center distance
✔ Snow load zone
German residential roofs commonly use:
- Clay flat tiles
- Concrete interlocking tiles
Correct hook selection depends on these parameters.
Step 2: Locate Structural Rafters
Never fix roof hooks to battens only.
Procedure:
1️⃣ Remove or lift the tile carefully
2️⃣ Locate the wooden rafter below
3️⃣ Mark the exact drilling position
4️⃣ Ensure proper edge distance
Hooks must be anchored directly into rafters for structural compliance.
Step 3: Pre-Drill & Install Stainless Steel Screws
Recommended:
- Use stainless steel wood screws
- Pre-drill pilot holes to avoid wood splitting
- Apply torque-controlled fastening
For high snow regions in southern Germany, use:
✔ 5–6 mm thick stainless steel roof hook
✔ Minimum two structural screws
Proper anchoring ensures snow load resistance.
Step 4: Adjust Hook Height & Tile Clearance
German clay tiles are brittle.
After fastening:
✔ Adjust hook height to avoid tile pressure
✔ Ensure no direct contact stress point
✔ Confirm smooth tile reinstallation
Grinding tiles is sometimes necessary but should be minimized.
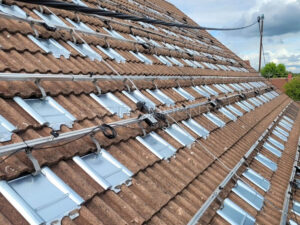
Step 5: Reinstall Tile & Waterproof Inspection
After fixing the hook:
- Reinstall tile properly
- Ensure no visible lifting
- Check water drainage path
- Confirm no gap under tile overlap
Waterproofing is as critical as structural strength.
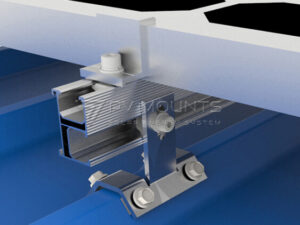
Step 6: Install Aluminum Rail on Roof Hook
Once hooks are aligned:
✔ Install aluminum mounting rails
✔ Check horizontal alignment
✔ Tighten mid clamp & end clamp
✔ Confirm torque values
Rail misalignment can cause module stress.
Engineering Tips for High Snow Load Regions
In Bavaria and alpine areas of Germany:
- Reduce hook spacing
- Increase hook thickness
- Verify load calculation
- Avoid aluminum hooks for heavy snow zones
Professional projects often require documentation for inspection.
Common Installation Mistakes in Germany
❌ Fixing to battens only
❌ Using undersized hooks
❌ Overtightening causing tile cracking
❌ Ignoring snow load calculations
❌ Not checking tile pressure points
Mistakes often show after the first winter season.
Recommended Specifications for German Projects
For most German tile roof installations:
✔ SUS304 stainless steel
✔ 5 mm thickness (6 mm in snow zone II–III)
✔ Reinforced rib design
✔ Adjustable height structure
✔ CE documentation available
Material and structure must match environmental exposure.
Why Stock Availability Matters in German Installations
German installers often work within:
- Grid connection deadlines
- Government incentive schedules
- Seasonal weather constraints
Manufacturers offering:
✔ Heavy duty hooks in inventory
✔ Fast export shipment
✔ Custom hook bending
✔ Stable stainless steel supply
help EPC contractors reduce installation delays.
Final Checklist Before Installation
Before starting installation in Germany, confirm:
✔ Tile type compatibility
✔ Snow load zone
✔ Stainless steel grade
✔ Hook thickness
✔ Screw specification
✔ Waterproof integrity
✔ Rail alignment
A properly installed tile roof hook ensures 25+ years structural stability.
PREGUNTAS FRECUENTES
Q1: Can I install solar roof hooks without removing tiles?
No. Tile lifting is required to access rafters safely.
Q2: Is SUS316 required in Germany?
Usually SUS304 is sufficient unless near coastal or industrial zones.
Q3: How many roof hooks per module row?
Depends on load calculation and rail spacing.