1. Introducere
Installing solar panels on metal roofs requires precision, the right hardware, and a deep understanding of roof types and mounting systems. One of the most critical components in these installations is the L foot, also known as an L bracket. L feet serve as the primary connector between your solar panel mounting rails and the metal roof itself. They ensure structural integrity, weatherproofing, and ease of maintenance, which are all vital for residential and commercial solar projects.
With the increasing demand for rooftop solar in 2025, choosing the right L foot for metal roof solar installations can make the difference between a reliable, long-lasting system and one prone to leaks, corrosion, or poor performance. In this guide, we’ll cover everything from types, materials, and compatibility to installation tips and common mistakes, ensuring your system performs optimally.
2. What Are L Picioare for Metal Roof Solar Panels?
2.1 Shape and Structure
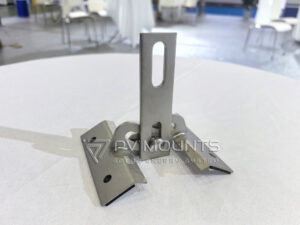
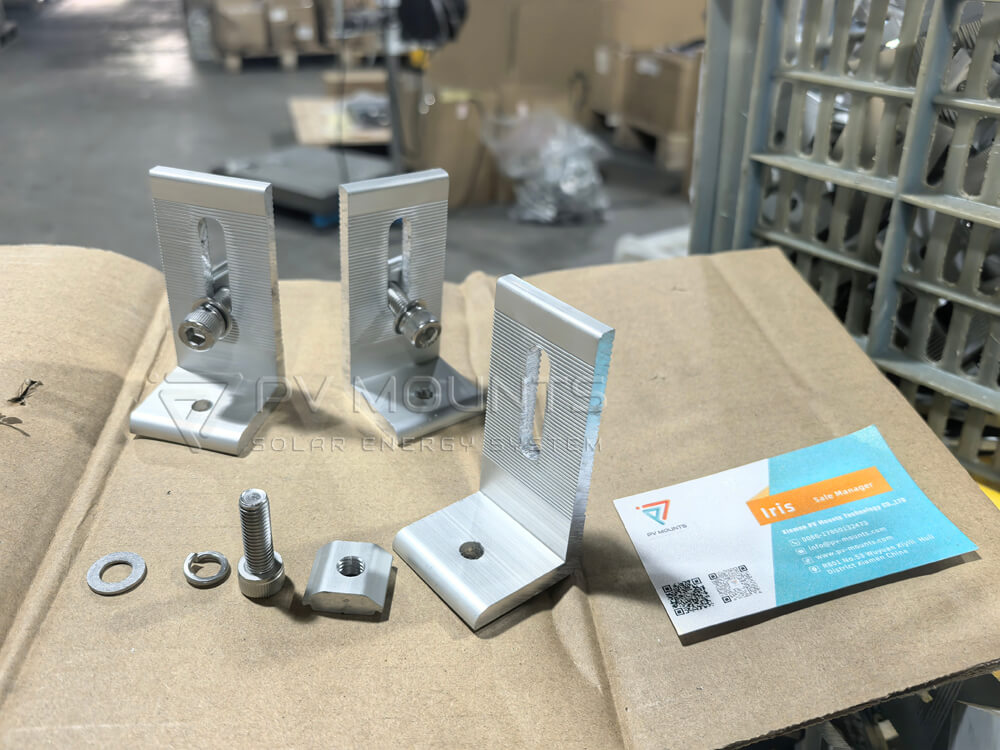
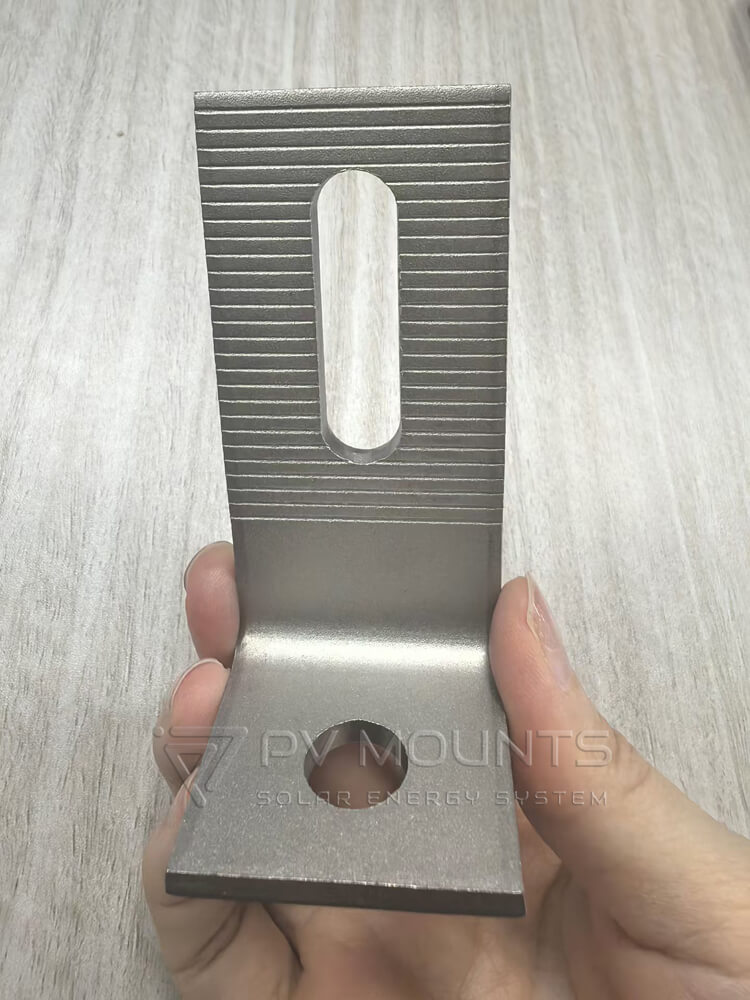
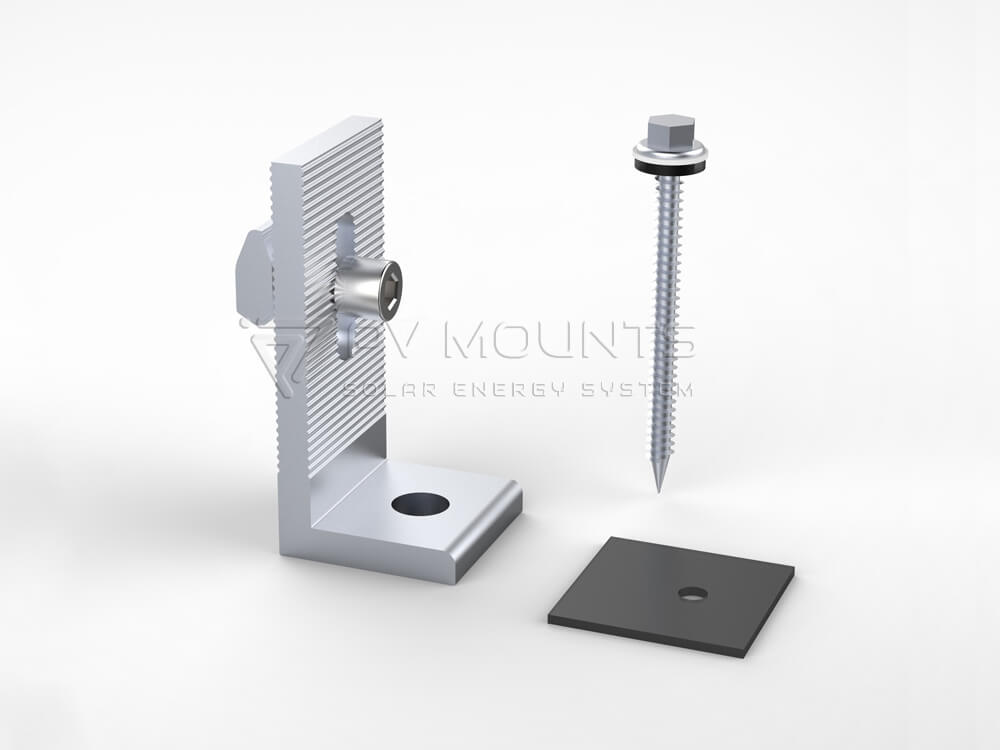
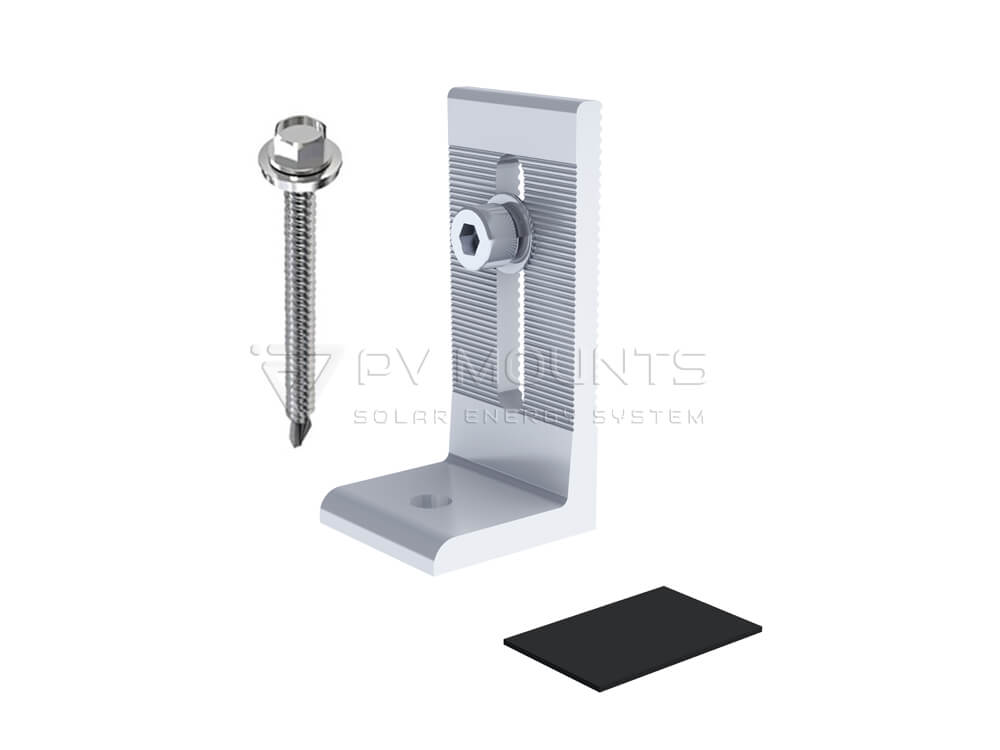
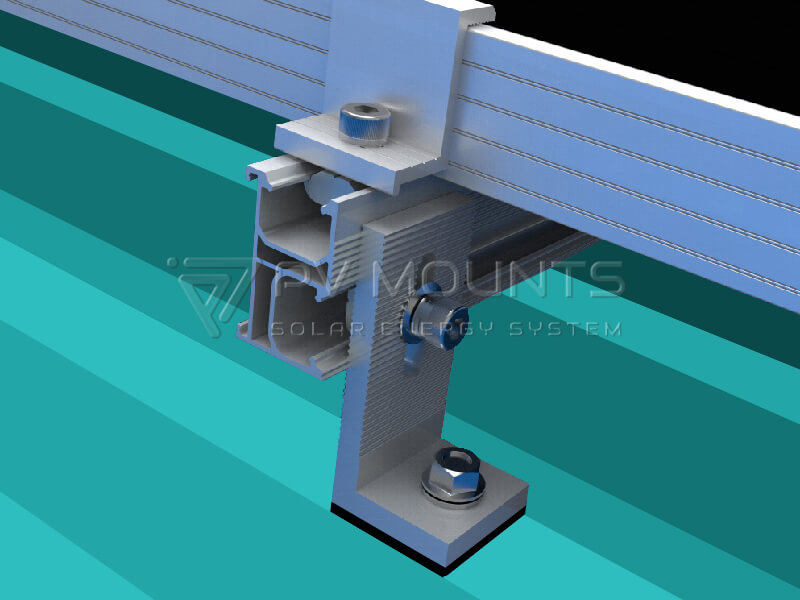
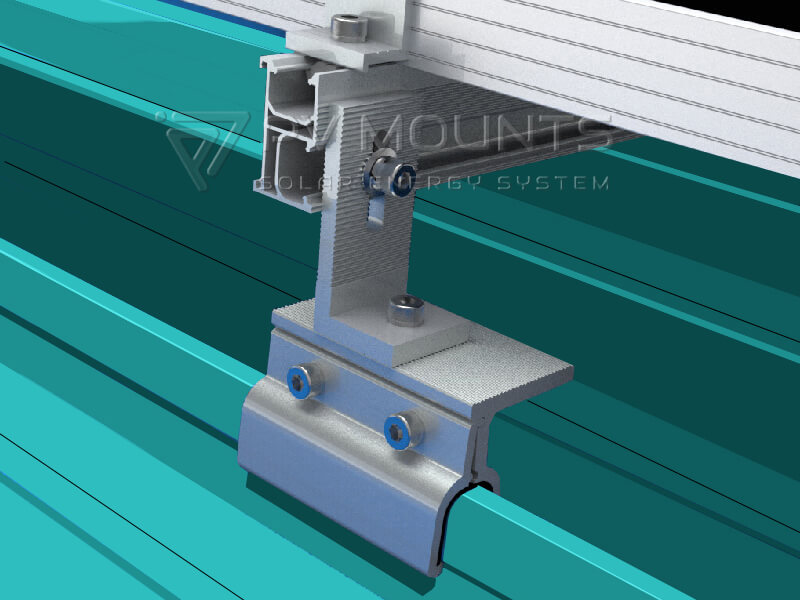
The L foot bracket gets its name from its simple “L” shape. A standard L foot includes:
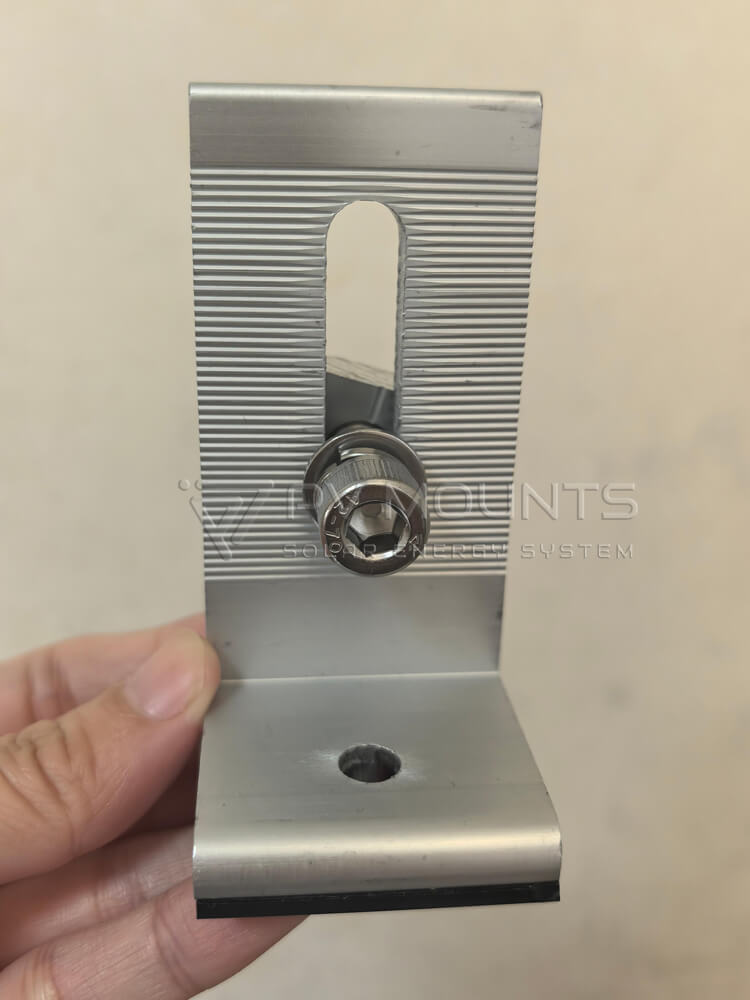
- Vertical leg – connects to the solar rail through a bolt or T-bolt
- Horizontal leg – attaches to the metal roof with a screw or via a clamp
- Mounting slots – provide adjustability during installation
- Aluminum 6005-T5 or SUS 304 – most common materials, providing corrosion resistance for 25+ years
Its simplicity makes it extremely versatile across most metal roofing types.
2.2 The Role of L Feet in Metal Roof Solar Mounting Systems
L picioare are the foundation of any metal roof solar mounting attachment system. They connect solar mounting rails to the metal roof, providing a secure and stable base for photovoltaic (PV) modules. L feet are versatile, compatible with multiple metal roof types, including R-panel metal roofs, corrugated metal roofs, and trapezoidal metal roofs. Their design allows installers to fix rails at the correct height and spacing, maintaining module alignment and load distribution.
Key points:
- Securely fixes rails to metal roof
- Supports different panel sizes and layouts
- Enables installation without compromising waterproofing

2.3 Why L Feet Are Popular for Metal Roof Installations
If you compare all metal roof attachment methods, L feet remain the most popular for four main reasons:
✔ They are cost-effective
L feet are one of the lowest-cost mounting attachments. Installers prefer them because they help reduce the overall per-watt system cost. Affordable yet reliable for large-scale installations.
✔ Universal compatibility
Fits with various rail systems and PV module sizes. They work with nearly all framed solar modules and standard mounting rails (45mm / 50mm / 60mm heights).
✔ Simple and fast to install
Most installers can complete an L foot installation with:
- A drill
- Self-tapping screws
- Torque wrench
No cutting, no flashing, no grinding.
✔ Flexible and High versatility for different roof sheet shapes
- Works across multiple metal roof types
- Adjustable height and alignment options
- Customized is available
That makes L feet a perfect default option for metal roof EPC contractors.

3. Types of L Feet for Metal Roof Solar Mounting
Standard L Foot Brackets
- Basic model for light-duty residential systems
- Aluminum or steel
- Ideal for standard corrugated or trapezoidal roofs
Heavy-Duty Reinforced L Feet
- Designed for high wind and snow load regions
- Thicker gauge metal, reinforced mounting holes
- Suitable for commercial and industrial projects
Pre-Assembled L Feet with EPDM Pad
- Comes with factory-fitted EPDM washers
- Simplifies installation
- Provides guaranteed waterproofing
Stainless Steel L Feet vs. Aluminum L Feet
- Stainless Steel: Excellent corrosion resistance, high durability, more expensive
- Aluminiu: Lightweight, cost-effective, good for most residential projects
- Application difference: Coastal areas and harsh environments often prefer stainless steel
4. How to Choose the Right L Feet for Your Metal Roof Type
This is the core decision-making section that helps installers/EPCs select the correct L foot for any metal roof.
Choosing the right L feet ensures long-term structural safety, waterproofing reliability, and overall project cost-performance.
Below is a 2025 professional selection framework widely used by EPCs and commercial installers.
4.1 Step 1 — Identify Your Metal Roof Type
Metal roofs come in many profiles. Your first step is to classify the roof:
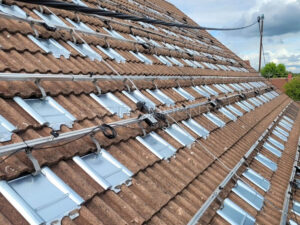
A. Trapezoidal Metal Roof
- Requires L foot with garnitură de cauciuc sau roof sheet adapter
- Screwed directly into crest
B. Corrugated Metal Roof
- Use standard L foot with EPDM sealing pad
- Self-tapping screw installation
C. Standing Seam Roof
- Never use screws
- Must use standing seam clamp + L foot
- Zero-penetration method
D. Metal Tile Roof / Pressed Tile Roof
- Requires tile-replacement bracket + L foot
- NOT suitable for tiled roofs using hooks
4.2 Step 2 — Confirm Structural Load Requirements
Evaluate:
- Wind load (kN/m²)
- Snow load (kg/m²)
- Panel orientation & span
- Rail distance & cantilever length
Recommended choice:
- Normal environment → Standard 6005-T5 L foot
- Typhoon/high wind → Heavy-duty L foot
- Coastal or chemical plants → SUS 304 / 316 stainless steel L foot
4.3 Step 3 — Check Waterproofing Requirements
Roofing waterproofing depends on 3 protection layers:
- EPDM sealing pad (pre-bonded recommended)
- Butyl tape below or around screw
- Correct tightening torque of stainless steel screw
If it’s a high-end residential system → Choose pre-applied waterproof L foot to reduce installer error.
4.4 Step 4 — Determine Rail System Compatibility
L feet must match:
- Rail slot size
- T-bolt type
- Clamp type
- Cable routing options
Important:
Installers often mix suppliers → This causes bolt mismatch or weak locking strength.
Use one unified system whenever possible.
4.5 Step 5 — Evaluate Long-Term Corrosion Performance (2026 Standard)
Metal roofs expand and contract with temperature.
A durable L foot must resist:
- Salt corrosion
- UV exposure
- Moisture
- Temperature cycling
Recommended materials:
- Aluminiu 6005-T5 anodized (12–15 µm)
- SUS 304 for coastal zones
- SUS 316 for extreme chemical + coastal environments
4.6 Step 6 — Assess Installation Speed & Labor Cost
Installers/EPCs increasingly optimize labor cost.
Your choice affects installation time:
| L Foot Type | Installation Speed | Note |
|---|---|---|
| Standard L foot | Medium | Requires manual waterproofing |
| L foot with EPDM pad | Fast | Best for residential projects |
| Standing seam clamp + L foot | Very fast | No drilling |
So, Let’s simply summerised
For Corrugated Metal Roofs
- Use L feet in combination with corrugated brackets or support plates
- Ensure screws penetrate the peak of the corrugation
- EPDM washers or rubber pads for waterproofing
For Trapezoidal Metal Roofs
- Pair L feet with trapezoid rubber pads
- Self-tapping screws recommended
- Correct torque is critical to prevent leaks
For R-Panel / Ribbed Panels
- Consider rib height
- Ensure L foot sits securely without deforming metal
- Adequate load distribution essential
Important Factors to Consider
- Wind speed: Verify local building codes and load requirements
- Sarcina de zăpadă: Adjust spacing and reinforcement
- Module size: Larger panels need more robust L feet
- Local standards: UL2703, AS/NZS, CE compliance
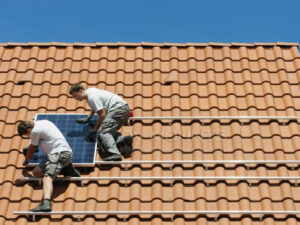
5. Installation Guide: How to Install L Feet on Metal Roofs
5.1 Tools Required
Professional installers should prepare the following:
- Impact driver / drill driver
- Self-tapping screws with EPDM washer
- Sealant if necessary (Butyl sealant tape or neutral cure sealant)
- Measuring tape & chalk line
- Torque wrench (5–8 N·m typical for L foot bolts)
- PPE: safety rope, gloves, non-slip shoes
- Rivet nut tool (if roof type requires)
5.1 Step-by-Step Installation
Step 1 – Locate Structural Purlins
- Identify structural support points under the roof
- Mark positions for L feet to ensure load transfer
Why?
Because attaching only to thin sheet metal = risk of sheet tearing under typhoon-level wind.
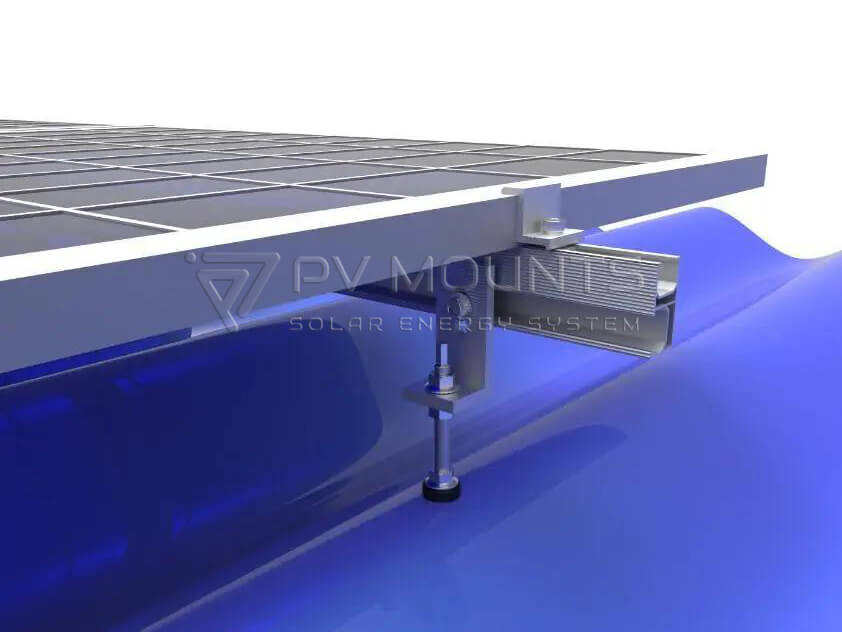
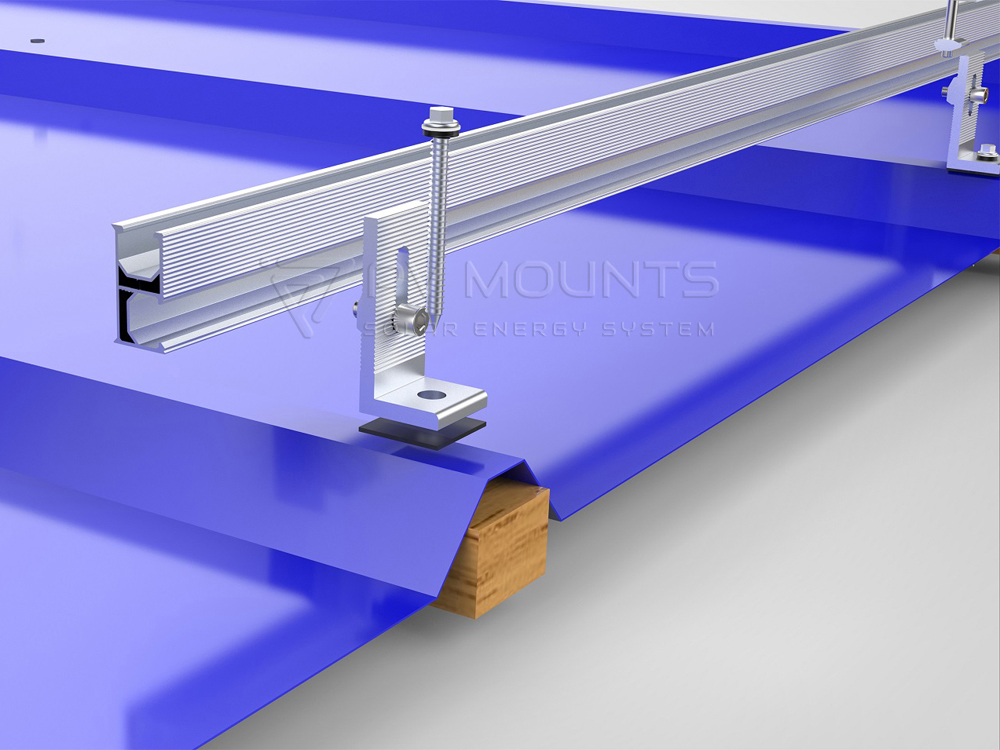
Step 2 – Position the L Foot
- Align L foot bracket on the designated mounting point
- Ensure orientation matches rail alignment
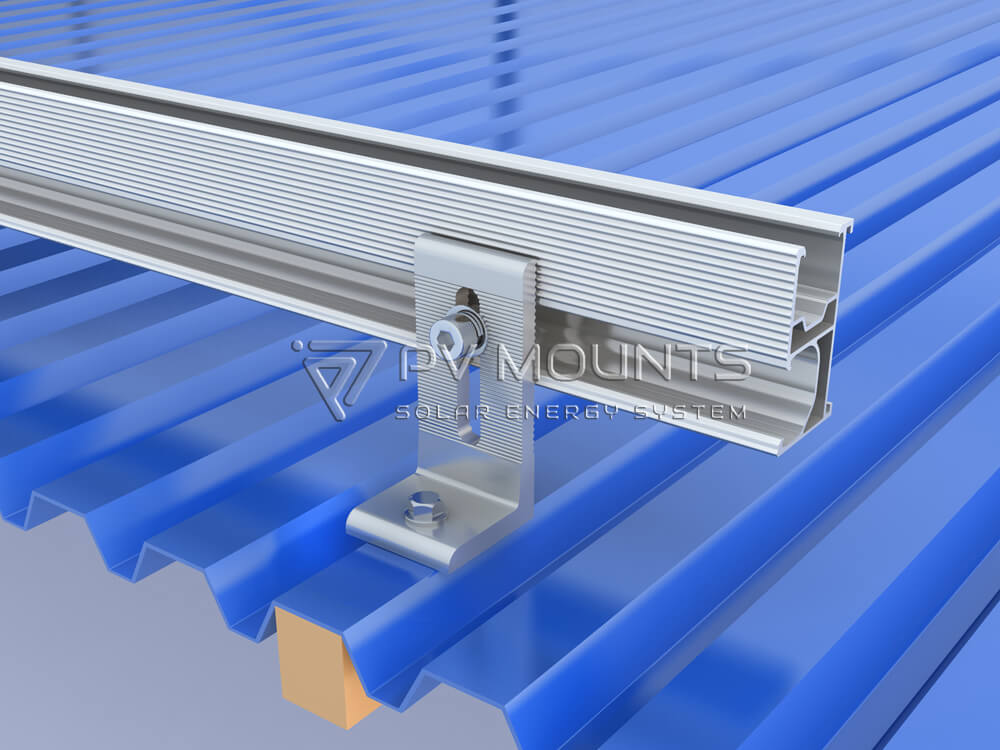
For example, When you install L feet kits on corrugated or trapezoidal tin roofs:
- Always install on the crest, not on the valley.
- Crest installation reduces water accumulation & increases structural stability.
How to define the position of L foot:
✔ Centered on rib
✔ Flat and stable
✔ EPDM pad fully contacting metal surface
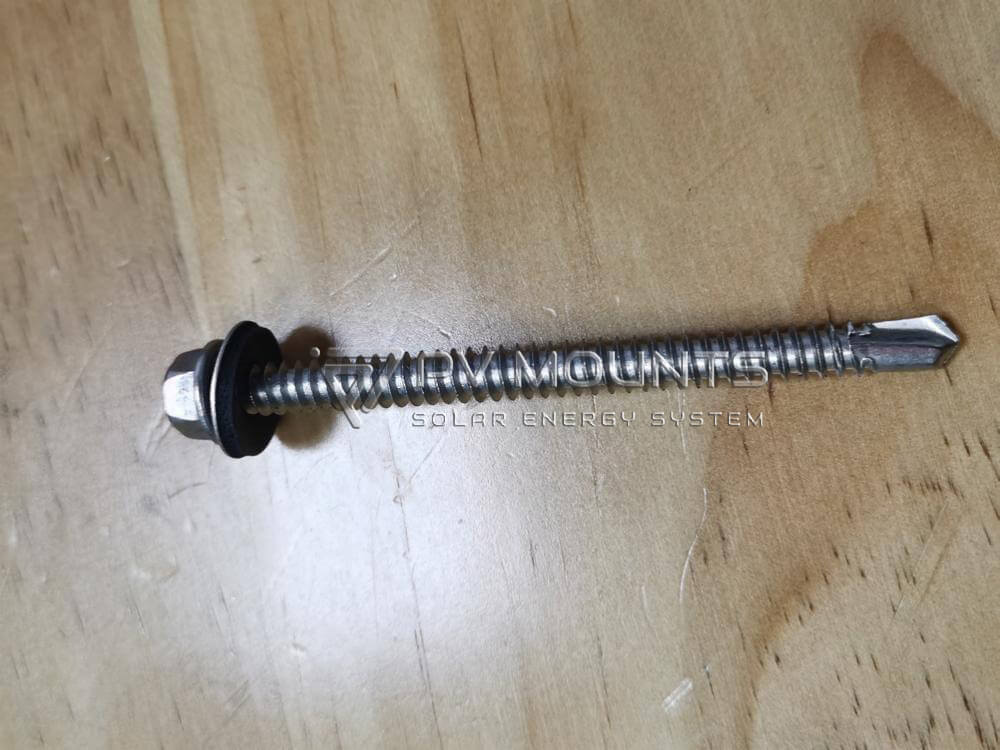
Step 3 – Use Self-Tapping Screws With Built-in EPDM Washer
This is the most important waterproofing step.
- Drill screws into roof metal carefully and vertically downward. Allow screw to cut through metal sheet
- EPDM washer ensures waterproofing. EPDM washer is compressed firmly but not over-squeezed.
If needed, apply a small amount of sealant around screw head - No flashing required (tile hook flashing unnecessary for metal roofs)
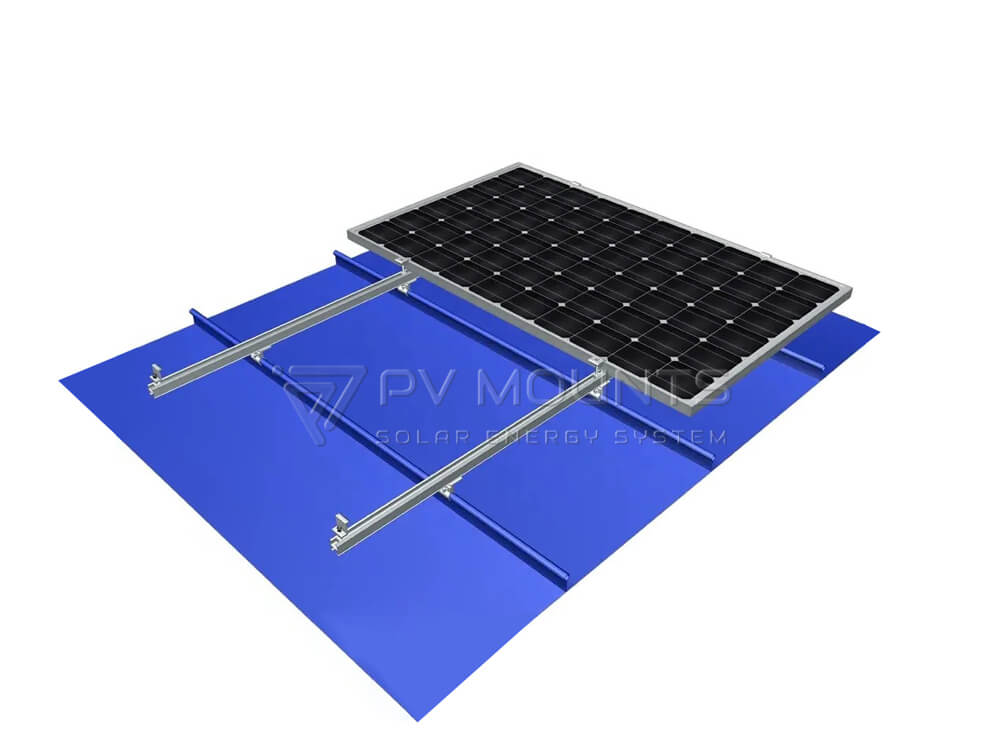
Step 4 – Install Rail on L Foot
- Place rails on top of L feet —— Insert T-bolt sau hex bolt into rail slot, Align with the L foot hole
- Tighten with bolts by using torque wrench (typically 6–8 N·m)
- Ensure straight alignment and spacing by using level tool
For long rows: Use a string line to check rail alignment.
Step 5 – Check Torque and Waterproofing
- Recheck all bolts and screws are tightened to manufacturer-recommended torque
- Verify EPDM washers are compressed properly with no deformation
- L foot has zero wobble
- Rail alignment tolerance within ±2 mm
- Confirm system stability
- Water test (optional, for residential jobs)

Pvm L 01 L Feet With Self Tapping Screw For Metal Roof Solar Installation (44)
5.3 Best Practices for a Long-Lasting Installation
(1) Use stainless steel screws
Carbon steel screws will rust in 2–4 years.
(3) Avoid mixing aluminum and steel without insulation
Prevents galvanic corrosion.
(4) Keep rail spans within engineering limits
Common span: 1.2–1.6 m depending on wind load.
(5) Conduct a final torque audit
Most EPCs now require a “Torque Report” for QA.
6. L Feet vs. Other Metal Roof Attachments: Which One to Use?
6.1 L Feet vs. Mini Rails
- Mini rails offer integrated height adjustment
- L feet + standard rail is more flexible for custom layouts
L Picioare
- Best for: Corrugated metal roof, R-panel, trapezoidal metal roof
- Structure: L-shaped bracket + rail
- Strength: Very high (because load is transferred directly to purlins)
- Waterproofing: Self-tapping screw + EPDM washer
- Advantages:
✔ Flexible height adjustment
✔ Universal for almost all metal roofs
✔ Best option for large commercial projects
Mini Rails
- Best for: Trapezoidal metal roofs with pre-existing rib height
- Structure: Short rail attached directly to roof
- Strength: Medium to high
- Advantages:
✔ Less rail = lower cost
✔ Faster installation
✔ Good for residential systems - Limitations:
✘ Not suited for very high wind areas
✘ Not suitable for heavy snow load regions
Conclusion:
If the project is commercial or large-scale, choose L feet + full rail.
If the project is small residential, mini-rail is a lower-cost option.
6.2 L Feet vs. Adjustable Tilt Kits
- Tilt kits allow fixed angle adjustment
- L feet primarily provide structural attachment; tilt kits are optional
Adjustable Tilt Kits
- Best for: Flat metal roofs, low-slope roofs (3°–10°)
- Role: Provide 10°, 15°, 20°, or custom tilt angle
- Advantages:
✔ Increase power generation
✔ Ideal for low-tilt regions in Southeast Asia - Limitations:
✘ More components
✘ Higher cost
✘ More wind load → needs stronger engineering
Conclusion:
If the customer needs higher energy yield or their roof pitch is too low → use Tilt kits.
For standard pitched roofs (10°–20°) → L feet are sufficient.
6.3 L Feet vs. Standing Seam Clamps
- Standing seam clamps are non-penetrating
- L feet require penetration but allow rail flexibility
(Important: These cannot be confused—they are different systems.)
Cleme pentru cusături permanente
- Best for: Standing seam roofs ONLY
- Attachment Type: Non-penetration (no drilling, no screws)
- Installation: Clamp locks onto the seam using set screws
- Advantages:
✔ 100% waterproof
✔ Ideal for premium metal roofs
✔ Zero damage to roofing warranty - Limitations:
✘ Cannot be used on corrugated, trapezoidal, R-panel
✘ Higher cost
Conclusion:
If the roof is standing seam, NEVER use L feet — always use clamps.
If the roof is corrugated / R-panel / trapezoid, NEVER use clamps — always use L feet.
6.4 When L Feet Are NOT Suitable
❌ Standing Seam Metal Roof (prefer clamp systems)
Because drilling voids the roof warranty. Must use standing seam clamps.
❌ Asbestos Roof / Fiber Cement Roof
Too brittle.
Must use special brackets or hanger bolts.
❌ Roofs with Very Low Purlin Strength or damaged metal panels
If the substructure cannot support screws, alternative systems required.


6.5 Summary Comparison Table
| Tip acoperiș | Best Attachment | L Feet Compatible? | Notes |
|---|---|---|---|
| Corrugated metal | ✔ L feet | Yes | Most common use case |
| Trapezoidal | ✔ L feet / mini rail | Yes | With rubber pad |
| R-panel | ✔ L feet | Yes | Consider rib height |
| Standing seam | ✔ Seam clamps | No | Non-penetrating |
| Tile roof | ✔ Tile hooks | No | Different roof category |
7. How many types of installed way to use L feet attachment on tin roof?
| Nu. | Tipul de acoperiș | Moduri de instalare | Tipul fasciculului | Soluții |
| 1 | Placă de acoperiș trapezoidală / metal / acoperiș de staniu | Soluții de foraj | Grindă de lemn | Picioare L + șurub din lemn |
| Grindă de oțel | Picioare L + șurub autofiletant | |||
| Grindă de lemn | Picioare L + șurub de suspendare | |||
| 2 | Montare directă | Nici o deteriorare sau penetrare a acoperișului | L feet + standing seam clamp+flange scew M8X20M |

8. How to Avoid Common Installation Mistakes
- Using too short screws → poor grip, leaks
- Ignoring roof span and load → structural failure
- Not installing on structural purlins → unsafe
- Using low-quality aluminum or thin steel → deformation or corrosion

9. Why Installers Choose Suporturi PV L Picioare
Professional installers and EPC companies often switch to PV Mounts L feet after dealing with inconsistent quality from other suppliers. Over the years, PV Mounts has built a strong reputation in Southeast Asia, Europe, and the Americas because our metal roof attachments are stable, durable, and engineered for long-term performance.
Below are the key reasons why PV Mounts L feet stand out in real project conditions.
9.1 Material Strength & Anti-Corrosion Performance
L feet are exposed to harsh outdoor environments for 20+ years, so material stability is critical. PV Mounts uses only high-grade raw materials: High-grade stainless steel and aluminum
For Aluminum L Feet: AL6005-T5
- High tensile strength
- Excellent rigidity for long rail spans
- Strong resistance to bending and deformation
- Better performance in coastal and humid regions
For Stainless Steel L Feet: SUS304
- Superior anti-corrosion properties
- Excellent load-bearing strength
- Suitable for high-wind zones and industrial rooftops
Tratarea suprafeței
✔ Sandblasting or anodizing for aluminum
✔ Passivation for stainless steel
✔ 20-year outdoor corrosion resistance
9.2 Factory Pre-Assembled Options (Save 30–40% Installation Time) -EPDM washers included
To support large commercial projects and high-volume EPC orders, PV Mounts provides pre-assembled L feet kits, including:
- L foot + bolt + nut
- L foot + rail adapter + bolt
- L foot + EPDM pad + self-tapping screws
This reduces onsite installation time and minimizes labor mistakes.
Benefits of Pre-Assembled Kits
- Faster rooftop installation
- Reduced risk of missing components
- More consistent tightening torque
- Ideal for large roll-out projects


9.3 Global EPDM Washer Standard
PV Mounts uses UV-resistant EPDM washers designed for 20-year durability in high-UV regions such as Southeast Asia, Australia, the Middle East, and Latin America.
Why EPDM Matters
- Maintains waterproofing under UV exposure
- Prevents long-term cracking
- Ensures stable screw sealing
- Withstands temperature cycles
Competitor washers often crack or harden within 1–2 years, leading to leaks. PV Mounts washers are tested under ASTM D1171 UV aging standards.
9.4 OEM & Private Labeling Services – For distributors and installers
PV Mounts supports global brands, wholesalers, and system integrators through OEM production:
OEM Advantages
- Laser engraving with your brand logo
- Custom packaging / label design
- Customized L foot length & thickness
- Material options: aluminum or stainless steel
This helps overseas partners establish brand identity and consistency when delivering complete mounting system solutions.
9.5 Consistent Quality Control You Can Trust
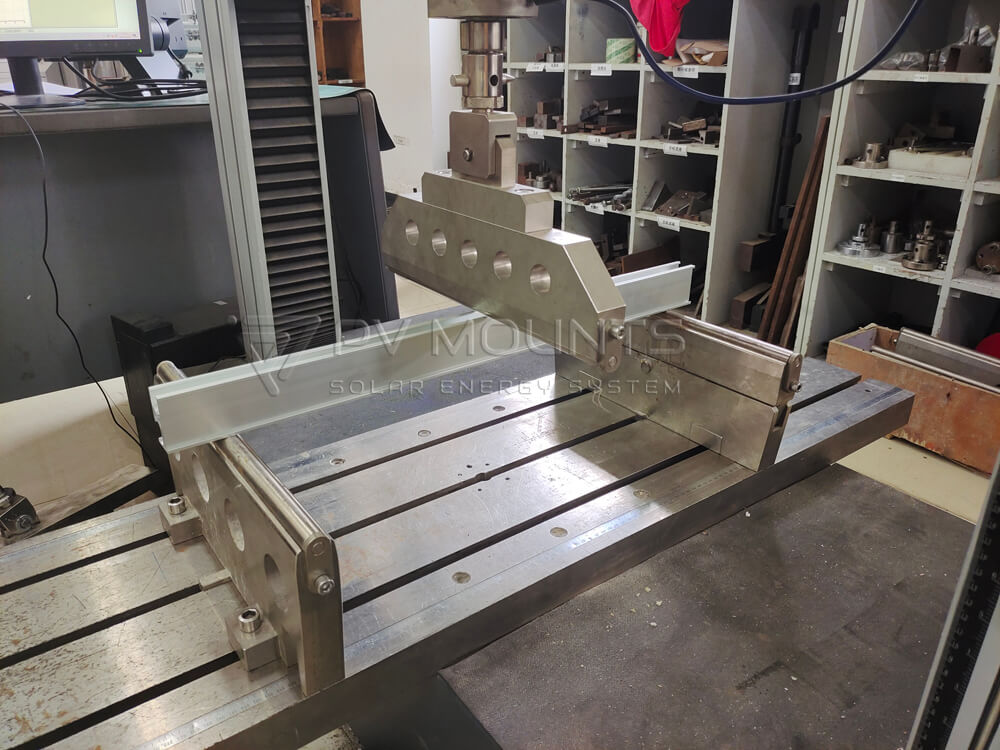
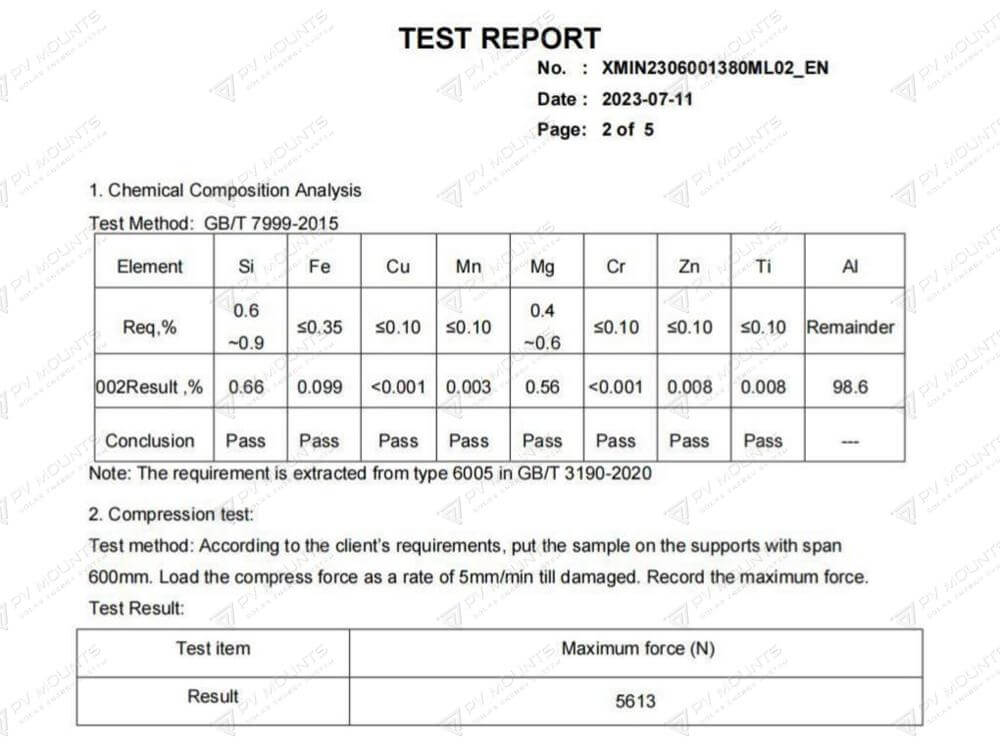
Teste mecanice trecute, proiectate strict în conformitate cu AS/NZS 1170.2-2002, JISC8955: 2017, Euro Code 8, DIN 1055, IBC 2009, MCS012, UL2703, SGS etc.
PVMOUNTS L feet is tested:
- Material certificate (EN, GB, or ASTM standards)
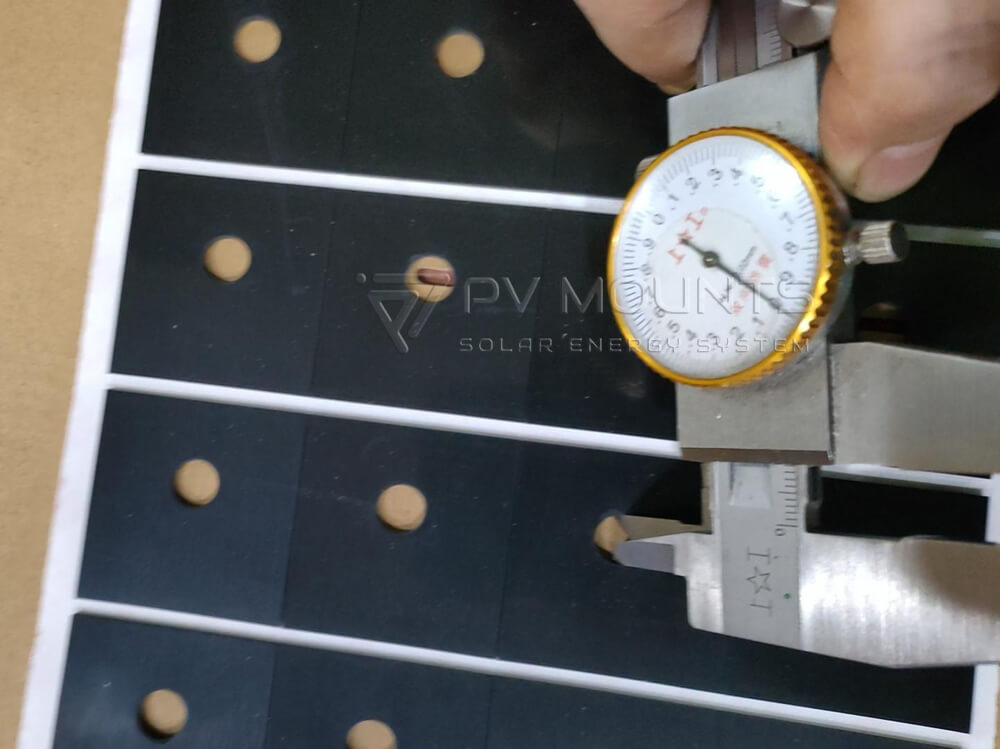
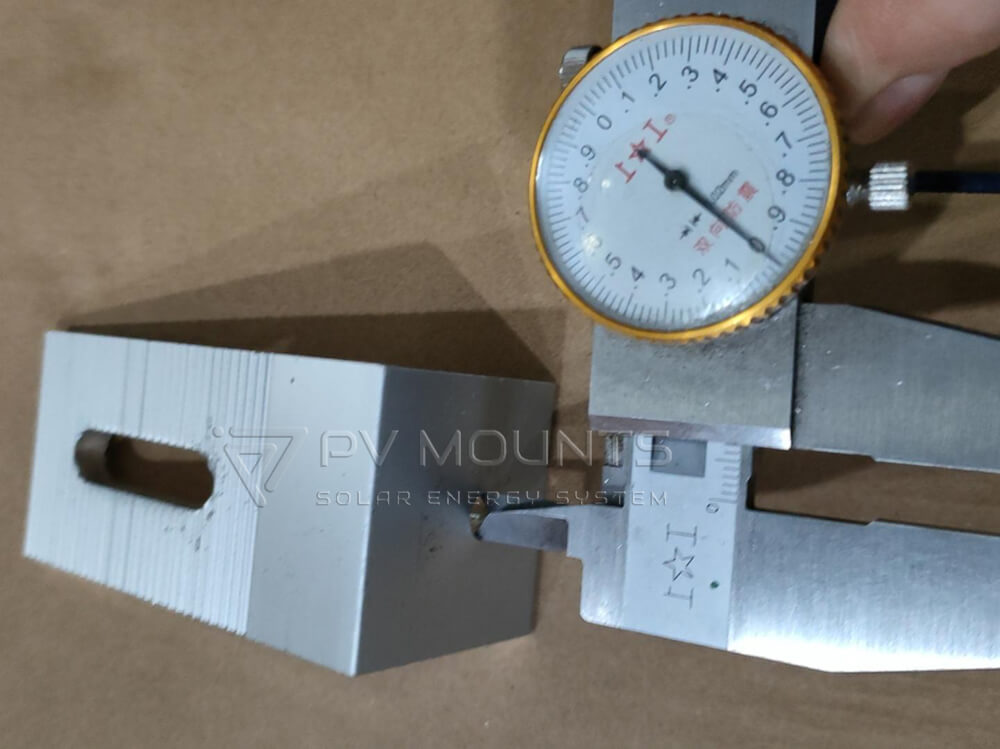
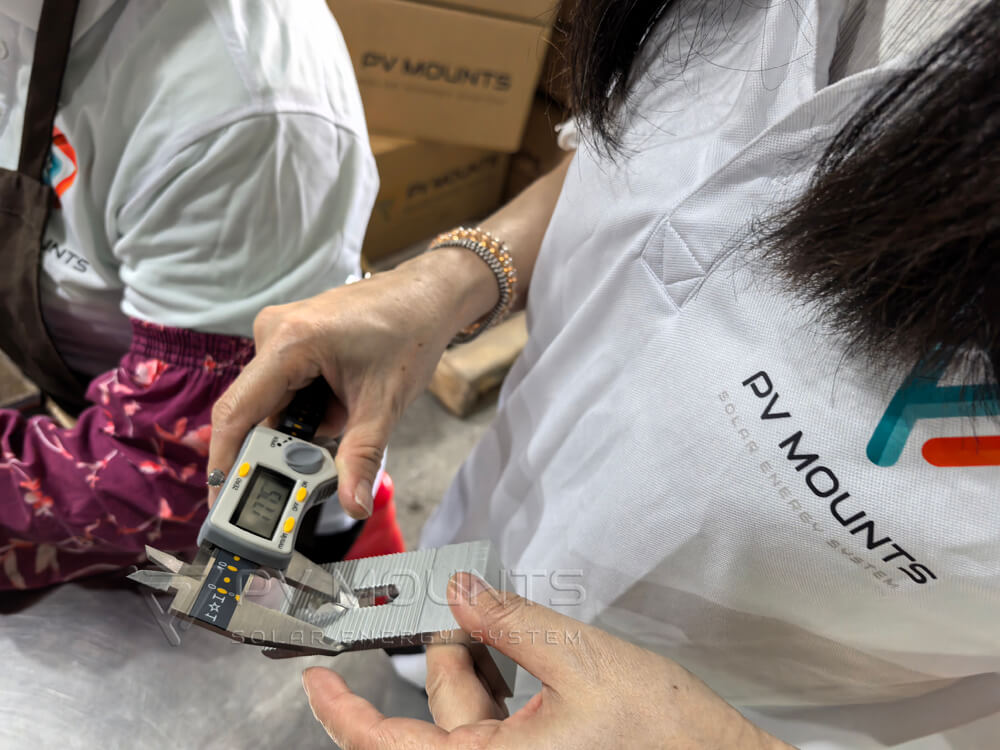
- Thickness tolerance verification
- Tensile strength testing (SGS test report)
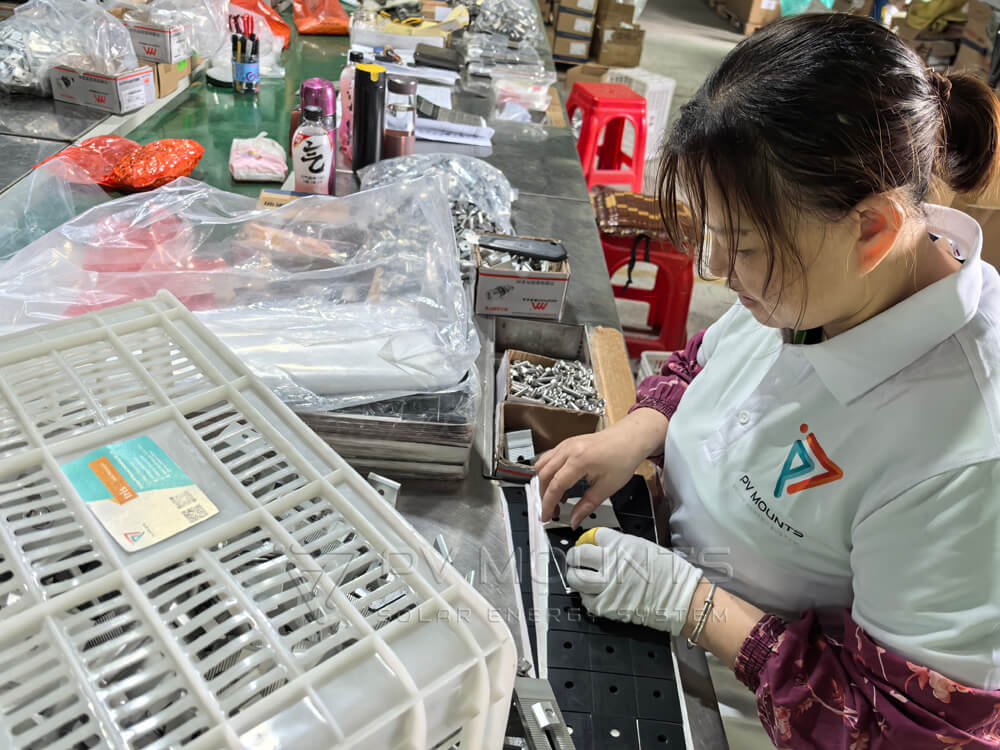
- Final assembly check before packing
This ensures installers always receive predictable, stable quality—critical for long-term PV performance.
10. FAQs About L Feet for Metal Roof Solar Systems
1). What are L Feet in a metal roof solar mounting system?
L Feet are aluminum brackets shaped like the letter “L,” used to securely fix solar rails to metal roofs. They provide a stable interface between the roof and the mounting structure without compromising waterproofing.
2). Are L Feet compatible with all types of metal roofs?
Yes. Most L Feet are compatible with common metal roof types such as trapezoidal, corrugated, R-panel and standing seam roof with clamps. However, the fastening method may vary depending on the roof profile and thickness. Selecting the correct screw type is crucial.
3). Do L Feet require pre-drilling on metal roofs?
For thin metal sheets (0.4–1.0 mm), self-tapping or self-drilling screws usually eliminate the need for pre-drilling. For thicker steel purlins, mild pre-drilling may be required to ensure proper engagement.
4). Are L Feet waterproof?
Yes — when installed with EPDM rubber gaskets and stainless-steel fasteners, L Feet offer excellent waterproof performance. The EPDM washer seals the screw penetration point to prevent leaks.
5). What is the typical material and load capacity of L Feet?
Quality L Feet are made from anodized aluminum (AL6005-T5), paired with SUS 304 stainless screws. They can withstand high wind and snow loads when installed according to engineering specs and local building codes.
6). Can L Feet be used for both residential and commercial projects?
Yes. L Feet are widely used in residential, C&I commercial rooftops, and even small industrial metal buildings. Their simple structure and flexible design make them suitable for most metal roof PV installations.
7). Do L feet require flashing on metal roof?
No, the self-tapping screws with EPDM washers provide waterproofing. Flashing is unnecessary on metal roof.
8). What is the lifespan of a typical L foot installation?
With proper materials and installation, 20–30 years or longer, matching panel life.
9). Can I use aluminum L feet in coastal areas?
Yes, but stainless steel is recommended in high-corrosion environments.
10).How do I determine the correct size?
Consider rail width, module dimensions, roof pitch, and load requirements.
11). Are PV Mounts L feet compatible with UL2703 Standard?
Yes, all products comply with major international standards.
11. Concluzie
Choosing the right L feet for metal roof solar panels is critical for a safe, durable, and efficient installation. Proper selection ensures compatibility with your roof type, withstands wind and snow loads, and provides years of maintenance-free performance.
As professional solar mounting structures and solar accessories manufacturer in XIAMEN, China, Suporturi PV provides high-quality metal roof L feet, pre-assembled with EPDM washers, and options for OEM labeling. Our team supports installers, EPC contractors, and distributors worldwide with reliable solar mounting attachments.
Get Your Free Metal Roof Mounting Consultation Today!