
Introduction
Improving solar panel performance is not only about choosing the right PV modules—it’s also about optimizing the installation angle. Many metal roofs—especially commercial standing seam roofs—are designed with low slopes. While this is great for water drainage, it’s not ideal for solar modules. Because these roofs often have one shared issue—their slope is too low to produce the best solar energy output.
Adjustable tilt kits solve this by allowing installers to raise modules to the best angle for their region. This is where Adjustable Tilt Kits for Optimal Solar Performance on Metal Roofs become a game-changing solution. It offer one of the most flexible and efficient mounting solutions.
Today’s solar EPCs and professional installers prefer to aluminum adjustable tilt kits because they combine lightweight design, corrosion resistance, and rapid installation. With seasonal angle adjustment capabilities and a fully aluminum structure, these systems help maximize annual energy output without major structural changes. When paired with non-penetrating standing seam clamps, the entire system becomes a safe, leak-free, and durable mounting structure.
This guide gives you a complete deep dive into how adjustable tilt kits work, why they matter for metal roofs, how they improve energy, and how EPCs & professionals can choose the right tilt range fo diferent geographical regions,how to install and maintain them.
1. What Are Adjustable Tilt Kits for Metal Roofs?
Adjustable tilt kits are mounting structures designed to raise and angle solar panels on roofs where the existing pitch is not optimal for solar production. Unlike fixed-tilt brackets, adjustable tilt kits allow installers to modify modify the angle seasonally or during installation to achieve maximum irradiation.
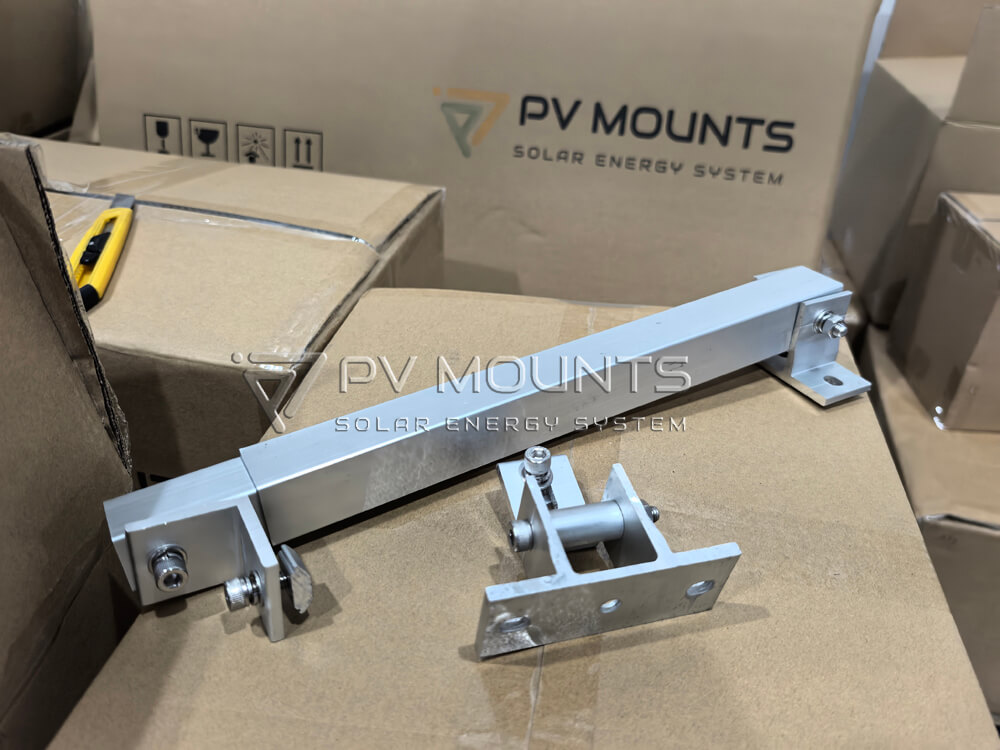
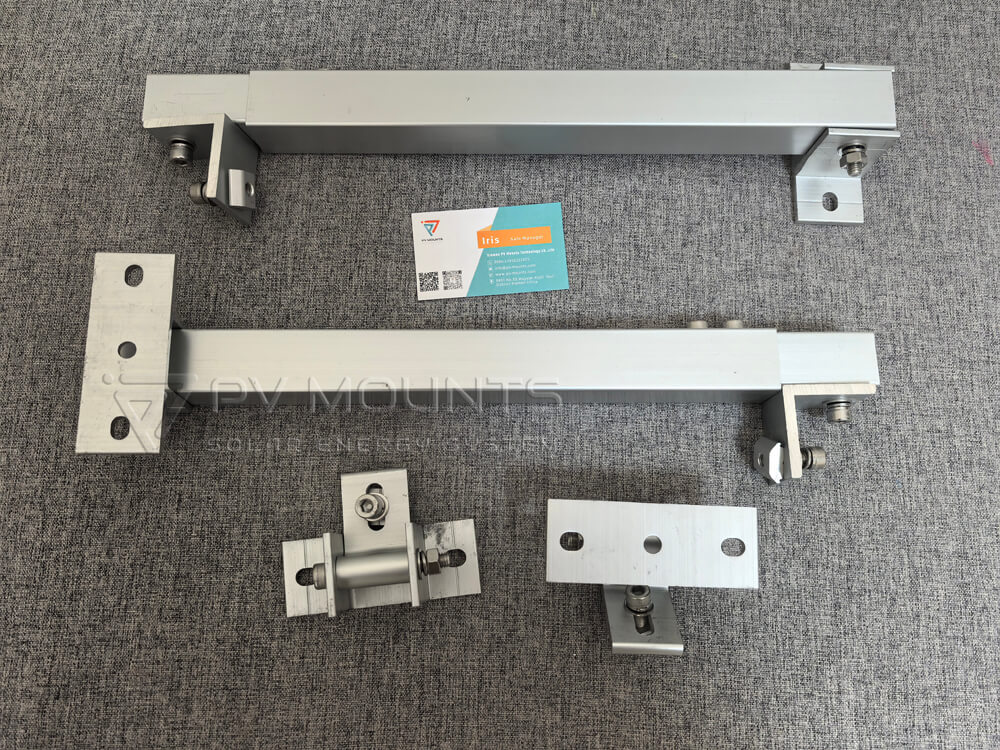
Components of a High-Quality Adjustable Tilt Kit
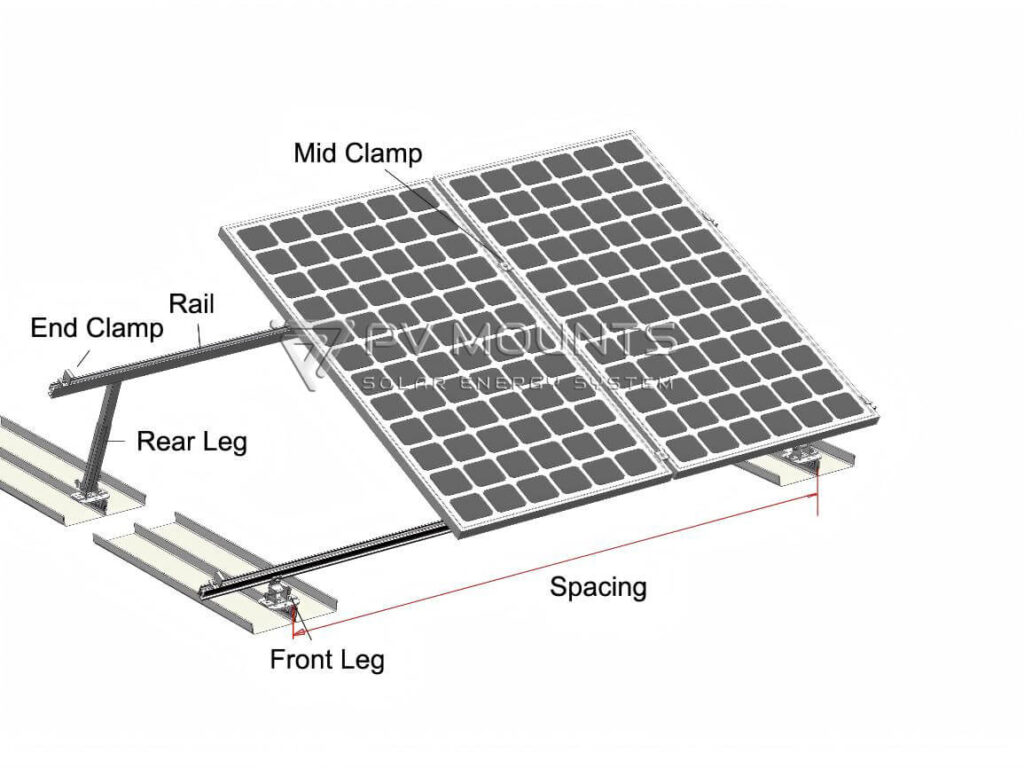
A standard adjustable tilt bracket system includes:
✔ Front Leg (Aluminum AL6005-T5)
Fixed height; supports the front edge of the PV module.
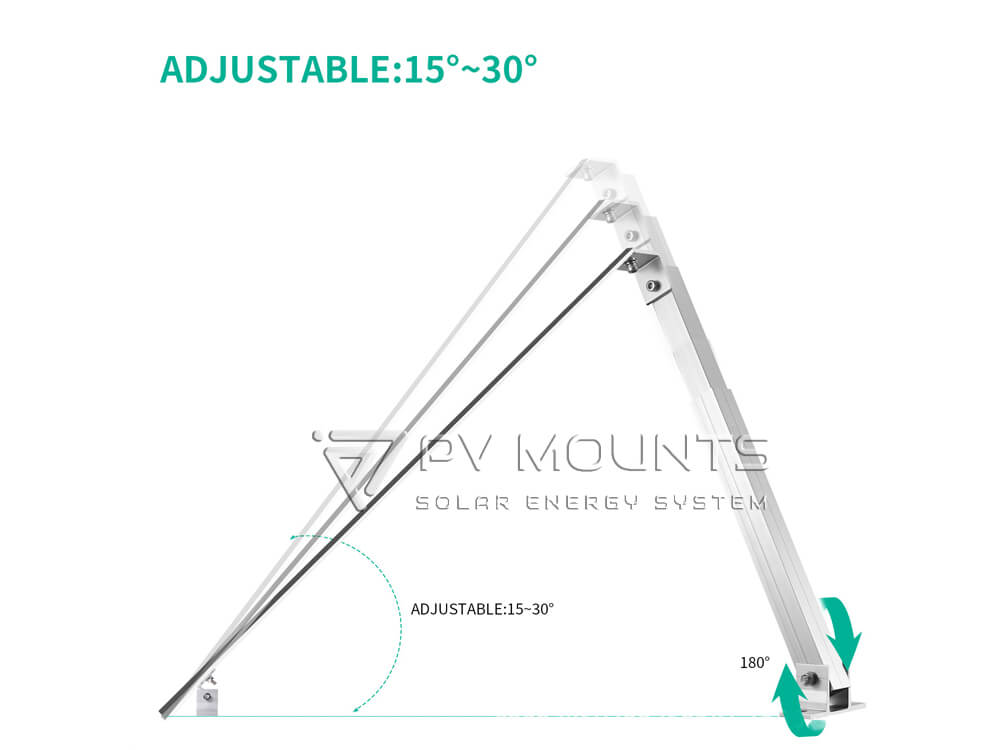
✔ Rear Leg (Adjustable & Aluminum AL6005-T5)
Allows tilt adjustment from 10–15°, 15–30°, or 30–60°.
✔ Aluminum Rail or Rail-less Plate
(Depending on design) holds panels firmly, minimizes twisting.
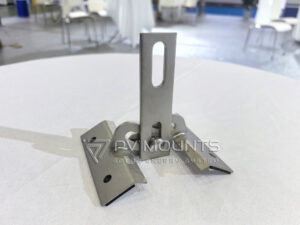
✔ SUS304 Stainless Steel Fasteners & EPDM Waterproof Pad
SUS304 bolts prevent corrosion; EPDM protects metal roof coating.
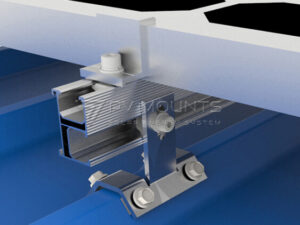
✔ Standing Seam Clamps (for non-penetrating mounting – optional)
suitable for:
- Snap-lock
- Double-lock
- Mechanical-lock
- Vertical seam roofs
The entire solar mounting structure is anodized silver to enhance corrosion resistance, making it suitable for coastal and humid regions—perfect for Southeast Asia, Middle East, Australia, and South America. A adjustable tilt mounting system combined these components to build a fast,stable and long-lasting mounting solution.
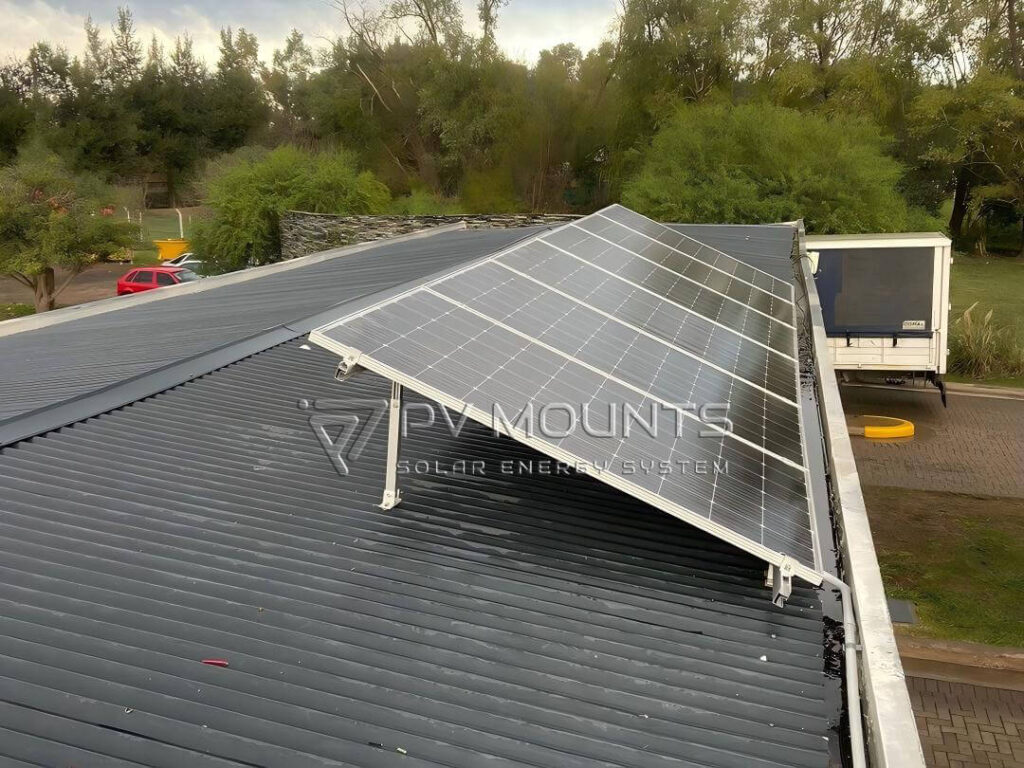
2. Why Install Adjustable Tilt Kits on Metal Roofs?
Benefits of Using Adjustable Tilt Kits for Metal Roofs
Adjustable tilt racking systems bring several advantages compared to flush-mounted systems. These benefits apply to standing seam roofs, trapezoidal metal sheets, corrugated metal roofing, and even concrete foundations when paired with the right brackets.
By raising the solar modules to a better tilt angle, installers can achieve:
2.1 Increase Power Generation
Solar panels generate the most power when facing the sun at the right angle.
Metal roofs with 0–12° pitch often underperform because the angle is too shallow. If your roof pitch is too shallow—common in metal roofs (3°–8°)—you lose up to 15–25% of energy annually.
A tilt kit instantly solves this, helping your project:
- Increase annual production by 8%–18%
- Capture more morning and afternoon sun
- Reduce partial shading impact
- Improve low-irradiation performance during winter months
BloombergNEF reports that optimized tilt angles can improve ROI significantly—especially for regions above 20° latitude.
2.2 Seasonal Angle Adjustment (Better seasonal performance – Major Advantage )
Unlike fixed tilt systems, adjustable tilt brackets kits allow the installer or facility owners to change the tilt angle during the year for Maximum Solar Efficiency based on seasonal sunlight changes.
Different seasons require different solar angles, Here is Typical adjustments guideline:
| Season | Recommended Tilt Angle | Effect |
| Summer | 10–15° | Low angle reduces wind load |
| Winter | 20–30° | Higher angle improves irradiation when the sun is lower |
| Cloudy / High-latitude | 25–35° | Better diffuse sunlight collection |
| Near the equator | 10–20° | usually optimal |
| All-year stability | 15°–25° | Depending on latitude |
Adjustable tilt kits allow fine-tuning of these angles, resulting in higher total annual kWh output. In a short word, Flexibility = more annual kWh output.
Systems with angle markers make adjustment quick and accurate. Some EPCs adjust angles twice a year, achieving 4–10% extra annual yield without extra cost.
2.3 Better Self-Cleaning and Drainage (Less dirt accumulation)
A steeper tilt:
- Prevents dust build-up
- Improves water runoff
- Reduces maintenance frequency
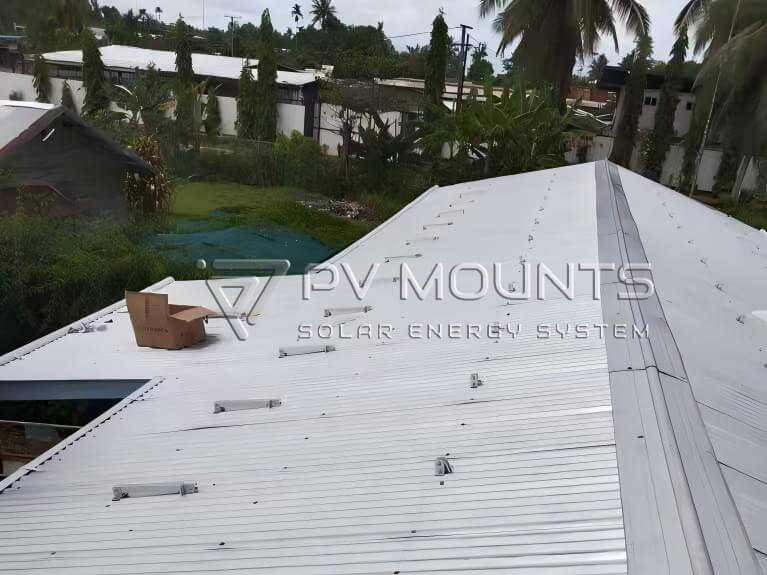
2.4 Non-Penetrating Option for Standing Seam Roofs
Thanks to compatible standing seam clamps, installation requires zero drilling, protecting:
- Roof warranty
- Waterproof integrity
- Long-term durability

2.5 Better Airflow and Lower Module Temperatures
Raising the back leg of a tilt kit increases airflow behind the module. Cooler modules run more efficiently and degrade slower.
On hot metal roofs (common in SE Asia and the Middle East), this can reduce module temperature by 4–7°C, improving performance.
3. Why Adjustable Tilt Kits Are Ideal for Standing Seam Metal Roofs
Standing seam metal roofs are considered the best rooftop structure for non-penetrating solar mounting.
Here’s why adjustable tilt kits match perfectly:
3.1 No drilling, no roof penetration
The kit connects using standing seam clamps that grip the seam mechanically.
This avoids:
- Roof damage
- Water leakage
- Warranty issues
- Structural weakening
3.2 Fast Installation
Aluminum tilt kits are lightweight and pre-assembled. Installers only need:
- Front leg
- Rear adjustable leg
- Rail or rail-less bracket
- Standing seam clamps
- Stainless-steel fasteners
Most systems can be mounted with only one tool, reducing labor time.
3.3 Strong and Durable Structure
Aluminum (AL6005-T5) is:
- Anti-corrosion
- Lightweight
- Strong under wind load
- Suitable for coastal or tropical climates
SUS304 bolts + EPDM rubber pads enhance waterproofing and vibration absorption.
4. Material Advantages: Why Fully Aluminum (AL6005-T5)?
Using full aluminum for the main structure offers:
- Lightweight design → easier installation
- High corrosion resistance
- Excellent strength-to-weight ratio
- Cleaner surface after anodizing
- Longer lifespan in coastal climates
All fasteners are SUS304, ensuring stability under heavy wind and snow loads.
This makes the system ideal for both residential and commercial metal roof projects.
5. Adjustable Tilt Range Options (10°–60°)
Our adjustable tilt kits come in multiple tilt ranges:
- 10°–15° (low-profile, strong wind resistance)
- 15°–30° (most common for mid-latitude regions)
- 30°–60° (for winter optimization or high-latitude locations)
Common Adjustable Tilt Angle Ranges and Their Uses
Adjustable solar panel tilt mounts are available in multiple angle ranges to suit different climates and project goals:
| Tilt Range | Typical Application |
|---|---|
| 10°–15° | Tropical and equatorial regions |
| 15°–30° | Most commercial rooftop projects |
| 30°–60° | High-latitude regions or winter optimization |
Selecting the right tilt range helps balance wind load, structural safety, and energy production.
Installers can select the correct angle range based on latitude and seasonal irradiation data.
6. Suitable Roof Types
6.1 Standing Seam Metal Roof (Non-Penetrating)
Compatible with:
- Double-lock seam
- Snap-lock seam
- Single-lock seam
Standing seam clamps eliminate the need for drilling and ensure:
✔ Zero roof penetration
✔ High pull-out strength
✔ Fast installation
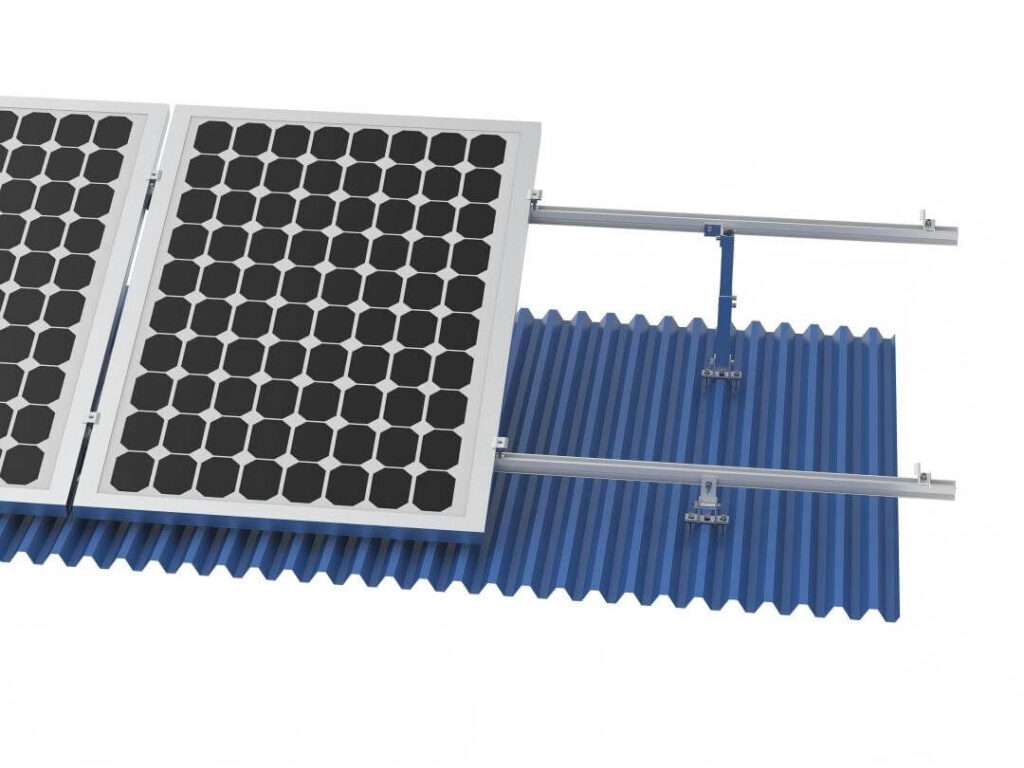
6.2 Corrugated and Trapezoidal Metal Roof (Penetrating Optional)
Adjustable solar panel mounts are widely used on metal roofs, including trapezoidal and corrugated profiles. When paired with the correct roof attachment or clamp system, they provide strong load distribution and secure fixation.
• Reduced risk of roof leakage when EPDM waterprof pads are used
• High sealing performance
• Secure wind-load resistance
• Fast installation with minimal roof disturbance
6.3 Flat Roof with Concrete Pier Blocks
Adjustable tilt kits can also mount to concrete piers—common in commercial rooftops.
On flat concrete roofs, adjustable mounting brackets allow panels to reach the optimal tilt angle without relying on roof slope. Systems can be anchored or combined with ballast depending on project requirements.
Benefits include:
- Flexible layout for space optimization
- Adjustable tilt without modifying roof structure
- Suitable for commercial and industrial rooftops
7. How Adjustable Tilt Kits Improve Solar Efficiency
7.1 Angle Optimization Based on GEO Location
Examples:
- Malaysia / Indonesia / Singapore:
Best performance with 10°–15° angles. - Chile / Mexico / Vietnam / Thailand:
15°–20° gives optimal performance. - USA / Europe / Japan:
20°–35° depending on latitude. - Northern regions:
Up to 40°–60° for winter optimization.
7.2 Maximize Solar Irradiation
A properly aligned adjustable tilt system ensures:
- More perpendicular sunlight
- Less shading from adjacent rows
- Better airflow under panels → reduced heat loss
Together, these produce a higher power generation yield.
8. How to install adjustable tilt brackets on metal roof?
8.1. Tools & Materials Required
Basic Tools
- Torque wrench (with correct Nm range)
- Spanner / socket set
- Tape measure & chalk line
- Cordless drill (only for corrugated/trapezoidal roofs—NOT for standing seam)
- Level or digital inclinometer
Components (Typical PVMOUNTS Adjustable Tilt Kit)
- Front leg (AL6005-T5, preassembled)
- Adjustable rear leg (AL6005-T5, preassembled)
- SUS304 bolts, nuts, washers
- EPDM rubber pads
- Rail sections (if rail-based system)
- Standing seam clamps or roof brackets
8.2. Pre-Installation Planning
8.2.1 Confirm Roof Type
Choose the right attachment method:
- Standing seam metal roof → Non-penetrating clamps
- Trapezoidal/corrugated → L-brackets or adjustable tilt roof brackets with EPDM pads
- Concrete → Base blocks or piers
8.2.2 Determine Tilt Angle
Most common:
- 10°–15° (tropics)
- 15°–30° (mid-latitudes)
- 30°–60° (high-latitude winter optimization)
8.2.3 Align Array Layout
Use a chalk line to mark:
- Row spacing
- Rail/leg spacing
- Module positions
Always verify local wind-load and snow-load requirements.
8.3. Installation Steps (Front Leg + Rear Leg System)
Below is the standard sequence for all metal roofs:
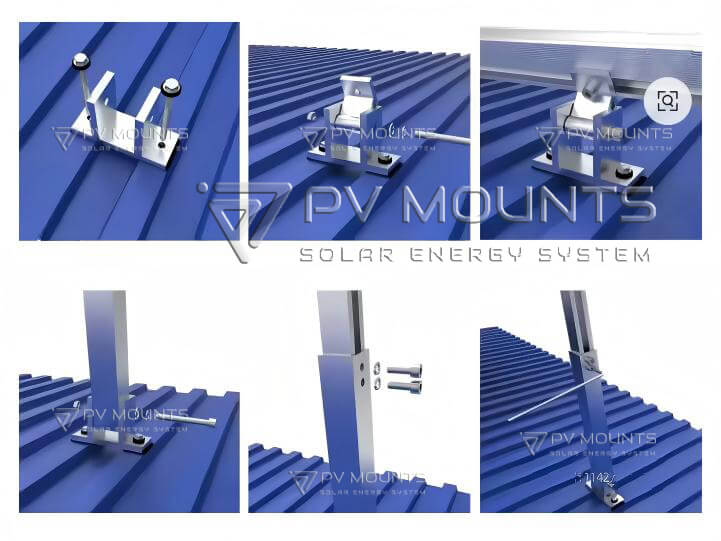
Step 1: Install Roof Attachments
Standing Seam Roofs (Non-Penetrating Installation)
- Place EPDM pad under clamp.
- Position clamp over seam (double-lock, snap-lock, or mechanical seam).
- Tighten set screws to manufacturer torque (typically 13–25 Nm depending on clamp type).
- Verify no seam deformation.
SEO keywords: standing seam solar clamp installation, non-penetrating tilt kit metal roof
Corrugated / Trapezoidal Roofs
- Position L-foot or bracket directly above roof purlin.
- Insert self-tapping screws with EPDM washers.
- Tighten to water-tight compression (do NOT overtighten).
- Ensure bracket alignment along chalk line.
Step 2: Mount the Front Leg
- Fix the front leg base to the clamp or bracket.
- Tighten SUS304 bolts to recommended torque.
- Ensure the base is perpendicular to the module layout.
- Repeat along entire row.
Tip: Front legs set the reference height—accuracy here reduces module alignment issues later.
Step 3: Install the Adjustable Rear Leg
- Connect rear leg to clamp/bracket.
- Set approximate tilt angle (15°, 20°, 25° etc.).
- Insert angle locking bolt (SUS304).
- Leave bolts slightly loose for final angle adjustment.
Step 4: Connect Rails (If Rail-Based System)
- Attach aluminum rails to both front and rear legs.
- Use rail splice kits if required.
- Check rail straightness using string/line method.
- Tighten all rail bolts.
If rail-less system: Skip this step — modules mount directly to front + rear legs.
Step 5: Set the Final Tilt Angle
- Use level or inclinometer to check final angle.
- Adjust the rear leg until the required tilt is achieved.
- Tighten angle locking bolt to specified torque.
- Verify uniform angle across entire row.
Step 6: Install Solar Modules
- Place module onto rails or leg brackets.
- Fix with module mid clamps and end clamps (aluminum + SUS304).
- Apply correct torque (usually 8–12 Nm depending on clamp type).
- Check module alignment across rows.
Step 7: Cable Management & Grounding
- Run cables under rail to avoid UV exposure.
- Use stainless clips or UV-resistant ties.
- Install grounding lugs and bonding jumpers where required.
- Maintain NEC/IEC clearance requirements.
8.4. Post-Installation Inspection Checklist
✔ All clamps tightened to correct torque
✔ All angle bolts locked firmly
✔ No clamp deformation on standing seam
✔ Rails straight with equal row spacing
✔ All EPDM pads compressed correctly (no gaps)
✔ Grounding continuity tested
✔ All modules secured properly
8.5. Installation Tips for Maximum Performance
✔ Use seasonal adjustment
✔ Ensure airflow
Higher tilt = cooler modules → higher efficiency.
✔ Use non-penetrating clamps when possible
Protects metal roof warranty and avoids leak risks.
✔ Keep rows aligned
Misalignment affects aesthetics and shading.
9. Installation Benefits for EPC, Installers, and Distributors
- Universal compatibility with most PV modules
- Fast installation with pre-assembled legs
- Lower logistics cost due to lightweight aluminum
- High stability under wind loads
- Flexible angle setting for seasonal optimization
- Non-penetrating option protects metal roofs
This makes adjustable tilt kits a preferred option for C&I projects, distributed PV, off-grid huts, container rooftops, and industrial metal roofs.
10. Maintenance & Long-Term Performance
To maximize system lifetime:
- 6-12 month recheck for bolts torque & angle stability
- Confirm angle-locking fasteners remain tight
- Ensure EPDM pads remain sealed and undamaged
- Remove debris from module surfaces seasonally
- After major storms recheck clamp tightness
- Annual inspection for corrosion or movement
With proper maintenance, fully aluminum adjustable tilt brackets can last 25+ years.
11.Why Adjustable Roofing Brackets Are a Long-Term Investment
Adjustable roofing brackets are designed for durability and adaptability. As module sizes increase and system designs evolve, adjustable mounts provide flexibility that fixed systems lack.
Long-term advantages include:
- Adaptability to future module upgrades
- Improved system lifespan through better airflow
- Lower maintenance costs over time
- Enhanced system resale and upgrade value
12.Why Choose PVMOUNTS Adjustable Solar Panel Mounts
PVMOUNTS focuses on practical, installer-oriented solutions for global rooftop solar markets.
Key advantages include:
- Fully aluminum adjustable solar panel tilt mount brackets
- Optimized for metal roofs and flat concrete roofs
- Non-penetrating and waterproof-compatible designs
- Fast installation and reduced labor cost
- Proven performance in commercial and industrial projects
Our adjustable solar panel mounts are engineered to meet the real-world demands of EPCs, installers, and distributors worldwide.
13. FAQ: Adjustable Tilt Kits for Metal Roofs
Q1: What is an adjustable solar panel tilt mount?
It is a mounting system that allows solar panels to be installed at variable angles to optimize sunlight exposure.
Q2: Are adjustable solar panel mounts worth it?
Yes. They improve energy output and provide flexibility without the complexity of tracking systems.
Q3: Can adjustable solar panel brackets tilt kits be used on metal roofs?
Yes, adjustable tilt kits are commonly installed on metal roofs using roof attachments brackets or standing seam clamps with EPDM waterproof sealing.
Q4: Do adjustable solar panel tilt mounts damage metal roofs?
When installed correctly with EPDM sealing and proper fasteners, adjustable tilt mounts do not damage metal roofs.
Q5: Do adjustable tilt kits require roof penetration?
Some systems use penetration with EPDM sealing pads, while others can be installed using non-penetrating clamps depending on roof type and project design.
Q6: Can adjustable tilt kits be used on standing seam metal roofs?
Yes. Standing seam clamps allow fast, non-penetrating installation without damaging the roof.
Q7: What tilt angles are available for adjustable solar panel mounts?
Most adjustable tilt kits are available in 10°–15°, 15°–30°, and 30° to 60° depending on system design.
Q8: What tilt angle should I choose for maximum performance?
It depends on your latitude, but 10°-15° or 15°–25° works well for most regions.
Q9: How often should tilt angles be adjusted?
Tilt angles kits are typically adjusted one to four times per year, depending on seasonal energy optimization goals of project.
Q10: Are aluminum tilt kits strong enough for high winds?
Yes. AL6005-T5 + SUS304 hardware provides excellent structural strength.
Q11: Do adjustable mounting brackets increase wind load risk?
When properly designed and installed, they meet wind load requirements and remain structurally safe.
Q12: Are adjustable tilt kits suitable for high wind areas?
Yes, when fixed to structural purlins and installed according to engineering specifications, adjustable tilt kits can meet high wind load requirements.
Q13: Does angle adjustment require tools?
Usually only basic tools (spanners). Adjustment takes minutes.
Q14: Do adjustable tilt kits work with micro-inverters or optimizers?
Yes—mounting holes are fully compatible.
Q15: What materials are best to use for adjustable solar panel tilt brackets kits?
High-quality adjustable tilt kits use AL6005-T5 aluminum structures with SUS304 stainless steel fasteners and EPDM waterproof components. They can offer the best balance of strength and corrosion resistance.
14. Conclusion: Maximize Solar Efficiency with Adjustable Tilt Kits
Adjustable tilt kits are one of the most effective solutions for improving solar output on metal roofs—especially standing seam systems. With a fully aluminum structure, flexible tilt angles, and corrosion-resistant components, these brackets deliver long-term stability and superior energy performance.
Whether you are an EPC, installer, or distributor, adjustable tilt solutions help optimize installation quality, reduce maintenance, and increase total energy yield year-round.
As professional solar mounting system and solar parts accessories manufacturer, we would like to share you more information to know this adjustable tilt mounting solution. If your project requires , corrosion-resistant anodizing, or rapid shipment, feel free to contact our engineering team.
Get your free consultation on metal roof adjustable tilt kits solar mounting solutions today with PV Mounts!