
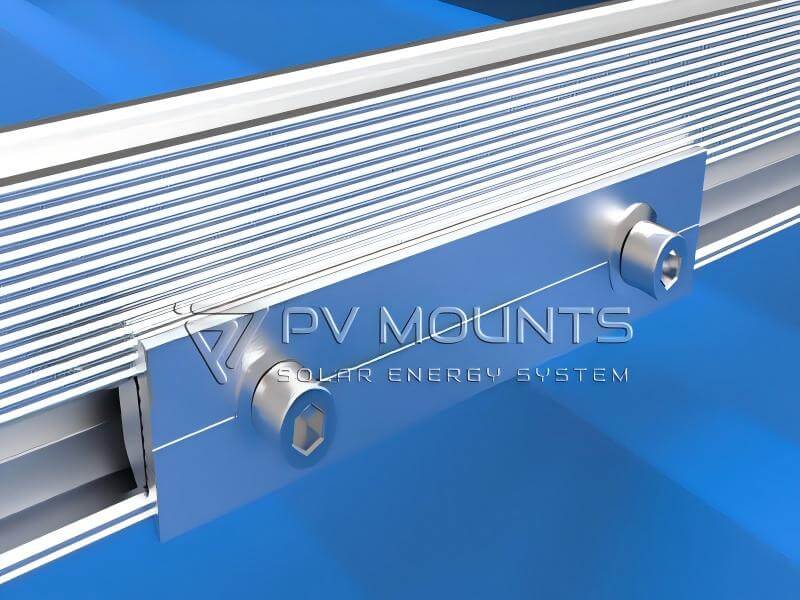
1. Quick Answer: What Is a Solar Rail Connector?
A Solar Rail Connector, also called a Rail Splice vagy Solar Rail Splice, is a component used to connect two sections of solar mounting rail into a continuous rail structure.
Its primary function is rail-to-rail connection.
The basic connection can be represented as:
Solar Rail → Rail Connector / Rail Splice → Solar Rail
Depending on the rail design, the connector may be secured using bolts and compatible rail sliding nuts.
Where this fastening method is used:
Solar Rail → Rail Connector + Bolt + Rail Sliding Nut → Solar Rail
The exact connection method depends on the solar rail profile, connector design, and mounting system.
For EPC contractors and distributors, the key procurement issue is therefore not simply choosing a “solar rail connector.” The connector must be compatible with the specific rail profile and fastening interface used in the project.
2. What Is a Solar Rail Connector?
A solar rail connector is a mechanical component designed to join two solar mounting rail sections.
Solar rails are often supplied in fixed lengths. When the required PV array is longer than one rail section, two or more rail sections may need to be connected.
The rail connector creates the mechanical connection between adjacent rail sections.
A typical rail connection is:
Rail Section A → Rail Connector → Rail Section B
The connector therefore performs a different function from the components used to secure PV modules.
Main function
The primary function of a solar rail connector is:
To connect two solar mounting rails and maintain a continuous rail structure for the PV mounting system.
The exact connector geometry and fastening method depend on the rail system.
3. Solar Rail Connector vs Rail Splice
In the solar mounting industry, Solar Rail Connector és Rail Splice can refer to the same basic component: a part used to connect two sections of solar mounting rail.
Common search terms include:
- Solar Rail Connector
- Rail Splice
- Solar Rail Splice
- Solar Mounting Rail Connector
- PV Rail Connector
- Solar Rail Splice Connector
- Solar Mounting Rail Splice
For procurement purposes, however, the important point is not the terminology.
The important questions are:
- Which solar rail profile is being used?
- What connector geometry matches that rail?
- How is the connector secured?
- Which bolts or fastening components are required?
- Has compatibility been technically verified?
4. What Does a Solar Rail Connector Do?
The solar rail connector performs the rail-to-rail connection function.
For example, when a solar mounting rail is supplied in two sections:
Rail A + Rail Connector + Rail B
The connector joins the two rail sections so that they can function as a continuous rail assembly within the mounting system.
This is particularly relevant when:
- The required rail length exceeds the available standard rail length
- A PV array requires multiple rail sections
- Rail sections need to be joined during installation
- A project uses standardized rail lengths for transportation and handling
The connector should be selected according to the actual rail system rather than by keyword alone.
5. How Are Two Solar Rails Connected?
The connection method depends on the solar rail and connector design.
A simplified connection is:
Solar Rail → Rail Connector → Solar Rail
In systems where bolts and rail sliding nuts are used, the fastening arrangement may be represented as:
Solar Rail → Rail Connector + Bolt + Rail Sliding Nut → Solar Rail
A Rail Connector / Rail Splice performs the rail-joining function.
A Bolt provides the fastening force.
A Rail Sliding Nut provides the threaded fastening interface inside the compatible rail channel where this connection method is used.
Therefore, these components should not be treated as interchangeable.
Important distinction
- Rail Connector / Rail Splice: joins two rail sections
- Bolt: fastens the connection
- Rail Sliding Nut: provides the threaded interface within a compatible rail channel
- Solar Rail: provides the structural rail section
The exact arrangement should always follow the connector and rail design.
6. Why Is Solar Rail Profile Compatibility Important?
Solar rail connectors are not universal components.
Different solar mounting manufacturers may use different rail profiles, including differences in:
- Rail cross-section
- Channel dimensions
- Internal geometry
- Wall thickness
- Connector engagement area
- Fastening position
- Connector dimensions
Because of these differences, a connector designed for one rail profile may not correctly fit another rail.
This means that purchasing a connector based only on a product name such as “solar rail connector” is not sufficient.
The rail profile is the starting point.
For a compatibility evaluation, the supplier may need:
- Rail model
- Rail cross-sectional drawing
- Rail dimensions
- Channel dimensions
- Rail sample
- Existing connector sample
- Photos with dimensions
- CAD drawing
The exact information required depends on the connection design.
7. Solar Rail Connector and Rail Sliding Nut
A Solar Rail Sliding Nut is different from a solar rail connector.
The two components may work together, but they perform different functions.
Solar Rail Connector
Purpose:
Connects two solar rail sections.
Solar Rail Sliding Nut
Purpose:
Provides a threaded fastening interface inside a compatible solar rail channel.
For example, where the rail system uses an M8 threaded sliding nut:
Rail → Sliding Nut → Bolt → Connector
Therefore:
The rail connector solves the rail-to-rail connection, while the rail sliding nut solves the threaded fastening interface inside the rail where applicable.
For detailed information about rail sliding nut dimensions and rail-profile compatibility, see our [Solar Rail Sliding Nut] guide.
8. Solar Rail Connector vs Mid Clamp vs End Clamp
These components are all used in PV mounting systems, but their functions are different.
| Component | Main Function | Connection |
|---|---|---|
| Solar Rail Connector / Rail Splice | Joins two solar rails | Rail ↔ Rail |
| Középső bilincs | Secures adjacent PV modules | PV Module ↔ Rail |
| End Clamp | Secures the outer edge of a PV module | PV Module ↔ Rail |
| Rail Sliding Nut | Provides threaded fastening interface in the rail | Rail ↔ Fastener |
| Bolt | Provides mechanical fastening | Component ↔ Component |
This distinction is important when preparing a mounting system BOM.
A rail connector should not be specified as a replacement for a mid clamp, end clamp, or rail sliding nut.
Each component performs a different connection function.
For the complete PV module fixing arrangement, see our [Solar Mounting Clamps] guide.
9. When Do You Need a Solar Rail Splice?
A solar rail splice is commonly required when one continuous rail cannot be supplied as a single section.
For example:
Required Rail Length: 6 m
Available Rail Length: 3 m + 3 m
The system may use:
3 m Rail + Rail Splice + 3 m Rail
The actual rail lengths depend on the manufacturer’s standard products and project requirements.
A rail splice may therefore be relevant for:
- Long rooftop PV arrays
- Commercial rooftop installations
- Industrial rooftop projects
- Rail systems supplied in standardized lengths
- Projects requiring multiple rail sections
The connector should be selected based on the actual rail profile and connection design.
For EPC projects, the rail connection should be considered during:
- Rail length planning
- Mounting system design
- BOM preparation
- Transportation planning
- Installation planning
- Procurement
The number of connectors required depends on the rail layout and the number of rail sections used.
10. Solar Rail Connector Material
The material of the rail connector should be compatible with the solar rail and the intended mounting environment.
Common considerations include:
- Mechanical requirements
- Corrosion environment
- Rail material
- Connector material
- Fastener material
- Outdoor exposure
- Project specifications
Material selection should therefore be evaluated as part of the complete rail connection rather than independently.
For long-term rooftop PV applications, material compatibility between the rail, connector, fasteners, and surrounding mounting components should be considered during procurement.
11. How to Select the Correct Solar Rail Connector
For EPCs, installers, and distributors, the following information should be confirmed before ordering.
1). Solar rail model
Identify the exact rail model or profile.
2). Rail cross-section
Provide the rail cross-sectional drawing or dimensions.
3). Connection position
Confirm where the connector engages with the rail.
4). Fastening method
Confirm whether the connector uses:
- Bolts
- Rail sliding nuts
- Other specified fastening components
The exact method depends on the rail system.
5). Fastener specification
Confirm the required bolt and threaded interface.
Where an M8 rail sliding nut is used, the bolt-side connection should match the specified M8 thread.
6). Material
Confirm the required connector and fastener material according to the project environment.
7). Quantity
Calculate the number of rail connections required from the actual rail layout.
8). Technical verification
Do not assume compatibility only because two products look similar.
The connector should be checked against the actual rail profile.
12. Can an Existing Solar Rail Use a Different Rail Connector?
Sometimes an existing solar rail may be used with a connector supplied by another manufacturer.
However, this should not be assumed automatically.
The critical requirement is mechanical and dimensional compatibility.
The supplier should evaluate:
- Rail cross-section
- Internal channel geometry
- Connector dimensions
- Engagement depth
- Fastening position
- Bolt specification
- Sliding nut compatibility, where applicable
If the interfaces are compatible, a project may be able to retain its existing rail while sourcing the required connection components separately.
This can be useful for EPC contractors and distributors who already have a preferred rail system but need additional mounting hardware.
13. Can Different Solar Mounting Suppliers Use the Same Rail System?
A PV project may involve components from different suppliers.
For example:
Supplier A: Solar Rail
Supplier B: Síncsatlakozó
Supplier C: Rail Sliding Nut
Supplier D: Mid Clamp / End Clamp
This type of multi-supplier procurement can work when the interfaces are compatible.
However, compatibility should be technically verified rather than assumed from nominal dimensions alone.
This is especially important for rail connectors because the connector must physically and mechanically match the rail profile.
For EPC procurement, the key principle is:
Source components according to interface compatibility, not supplier name alone.
14. Common Solar Rail Connector Procurement Mistakes
Mistake 1: Buying only by the keyword
“Solar rail connector” does not identify a specific rail profile.
Better approach:
Provide the rail model, drawing, dimensions, or sample.
Mistake 2: Assuming all rail connectors are interchangeable
Different rails can have different cross-sectional geometries.
Better approach:
Verify connector-to-rail compatibility.
Mistake 3: Confusing the connector with the sliding nut
The rail connector joins two rails.
The sliding nut provides a threaded fastening interface inside a compatible rail channel.
Better approach:
Specify each component according to its function.
Mistake 4: Assuming M8 means universal compatibility
Two rail systems may both use an M8 threaded connection while having different external rail and sliding-nut geometries.
Better approach:
Check both the threaded interface and the physical rail geometry.
Mistake 5: Ordering without checking the fastening method
The connector may require a specific bolt or fastening arrangement.
Better approach:
Confirm the complete connection assembly before ordering.
15. EPC Procurement Checklist for Solar Rail Connectors
Before issuing an RFQ, provide the following information whenever possible:
| Item | Information to Provide |
|---|---|
| Rail model | Exact model or reference |
| Rail profile | Cross-sectional drawing or dimensions |
| Rail length | Standard or project-specific |
| Connector requirement | Mennyiség |
| Fastening method | Bolt / sliding nut / specified system |
| Bolt specification | Thread and length if known |
| Rail sliding nut | Existing or required |
| Anyag | Project requirement |
| Project environment | Rooftop / outdoor / coastal, etc. |
| Rajzolás | CAD / PDF / dimensioned sketch |
| Sample | Physical sample if available |
Providing this information allows the supplier to evaluate the connection more accurately.
16. Custom Solar Rail Connector Solutions
Not every solar rail uses the same profile.
For projects using a proprietary or non-standard rail, a standard connector may not be suitable.
In this situation, the connector can be evaluated according to the customer’s actual rail.
Useful information includes:
- Rail cross-sectional drawing
- Rail dimensions
- CAD file
- Rail model
- Existing connector
- Physical rail sample
- Installation photos
- Required fastening method
The objective is to match the connector to the actual rail interface.
For custom requirements, technical verification should be completed before mass production.
17. How PV Mounts Can Support Your Rail Connection Requirement
If you already have a solar rail, you do not necessarily need to replace it simply because you need additional mounting components.
PV Mounts can evaluate the compatibility of:
- Solar Rail Connectors
- Rail Splices
- Rail Sliding Nuts
- Bolts
- Mid Clamps
- End Clamps
- Other compatible PV mounting accessories
For an existing rail, the most useful starting point is the rail profile.
You can provide:
- Rail cross-sectional drawing
- Rail dimensions
- Rail model
- CAD drawing
- Photos
- Physical sample
PV Mounts can then evaluate the required rail connection and related components, subject to technical verification.
18. Solar Rail Connection: The Complete Interface
A solar mounting rail system contains several different connection interfaces.
Rail-to-Rail
Solar Rail → Rail Connector / Rail Splice → Solar Rail
Purpose: connect two rail sections.
PV Module-to-Rail
PV Module → Mid Clamp / End Clamp → Bolt + Compatible Rail Interface → Solar Rail
Purpose: secure PV modules to the rail.
Fastener-to-Rail
Bolt → Rail Sliding Nut → Solar Rail
Purpose: provide a threaded fastening interface where the rail system uses a sliding nut.
Understanding these interfaces makes it easier to prepare a complete mounting system BOM and avoid component mismatches.
19. Solar Rail Connector Summary
A Solar Rail Connector, also known as a Rail Splice, is used to connect two solar mounting rail sections.
Its core function is:
Rail-to-Rail Connection
The most important selection factors are:
- Solar rail profile
- Connector geometry
- Connection method
- Fastener specification
- Rail sliding nut compatibility, where applicable
- Material requirements
- Project environment
- Technical verification
A rail connector should not be selected by product name alone.
For EPC projects and distributors, providing the actual rail profile, drawing, dimensions, or sample is the most reliable starting point for compatibility evaluation.
20. FAQ
A solar rail connector is a component used to join two sections of solar mounting rail. It is also commonly called a rail splice or solar rail splice.
In solar mounting applications, “solar rail connector” and “rail splice” can refer to the same basic rail-to-rail connection component.
Its primary function is to connect two solar mounting rail sections into a continuous rail assembly.
Not necessarily. The fastening method depends on the solar rail and connector design. Where the system uses bolts and rail sliding nuts, the sliding nut provides the threaded fastening interface.
No. A rail connector joins two rail sections. A rail sliding nut provides a threaded fastening interface inside a compatible rail channel.
No. A mid clamp secures adjacent PV modules to a solar rail, while a rail connector joins two rail sections.
No. An end clamp secures the outer edge of a PV module to the rail. A rail connector joins two rail sections.
It may be possible if the connector is mechanically compatible with the existing rail. The rail profile, connector dimensions, fastening method, and interfaces should be technically verified first.
Potentially, yes. If the required connector and other mounting components can be matched to the existing rail interfaces, the existing rail may be retained.
The most useful information is the rail model, cross-sectional drawing, rail dimensions, required quantity, fastening method, and any existing connector or rail sample.
Custom evaluation may be possible for non-standard or proprietary rail profiles. A rail drawing, CAD file, dimensions, photos, or physical sample can be used as the starting point for technical evaluation.
The bolt specification depends on the specific rail connector and fastening design. Where an M8 rail sliding nut is used, the bolt must match the specified threaded interface.
The rail profile determines how the connector engages with the rail. Two rails may have similar dimensions or use the same bolt thread while still requiring different connector geometries.
21. Need a Solar Rail Connector for Your Existing Rail?
Have an existing solar rail?
You may not need to replace it.
Send us your:
- Solar rail cross-sectional drawing
- Rail model
- Rail dimensions
- CAD file
- Photos
- Physical sample
PV Mounts can evaluate the compatible Solar Rail Connector / Rail Splice and related fastening components for your project, subject to technical verification.
Request a Compatibility Evaluation →
For related components, see:
- Solar Rail Sliding Nut – for rail profile and threaded-interface compatibility
- Solar Mounting Clamps – for PV module-to-rail fixing
- Solar Mounting Hardware gyártója – for complete PV mounting hardware sourcing
- Roof Solar Mounting System Manufacturer – for complete rooftop solar mounting solutions


 Hungarian
  English
  Spanish
  Portuguese
  Russian
  Arabic
  Romanian
  French