

Definition: What Is a Solar Grounding Clip Installation Procedure?
A solar grounding clip installation procedure is the process of installing conductive bonding components between photovoltaic module frames and mounting rails to establish electrical continuity within a PV grounding system.
Solar grounding clips are designed to:
- Bond PV module frames to mounting rails
- Maintain electrical continuity between metallic components
- Support equipment grounding requirements
- Improve long-term photovoltaic system safety
A correct installation requires proper selection of:
| Component | Fonction |
|---|---|
| Solar Grounding Clip | Creates electrical bonding between module frame and rail |
| PV Module Frame | Provides conductive connection point |
| Rail de montage | Transfers bonding connection across array |
| Cosse de mise à la terre | Connects structure to grounding conductor |
| Grounding Conductor | Provides fault current path |
For EPC contractors and solar installers, proper PV grounding clip installation is essential because incorrect installation may reduce electrical continuity and system reliability.
Solar Grounding Clip Installation Quick Overview
| Installation Step | Purpose |
|---|---|
| Select compatible clip | Match module and rail |
| Position clip | Create module-to-rail bonding |
| Install PV module | Ensure contact with clip |
| Install earthing lug | Connect grounding conductor |
| Test continuity | Verify grounding path |
1. Why Proper Solar Grounding Clip Installation Matters
Solar grounding clips are small components, but they perform an important electrical bonding function inside photovoltaic mounting systems.
A complete PV grounding path typically follows:
PV Module Frame

↓

Solar Grounding Clip

↓

Mounting Rail

↓

Earthing Lug

↓

Grounding Conductor

↓

Grounding Electrode System
Each component has a specific role.
A grounding clip does not replace an earthing lug.
An earthing lug does not replace a grounding clip.
Both components work together to create a complete photovoltaic grounding system.
Incorrect installation may result in:
| Installation Problem | Potential Impact |
|---|---|
| Incorrect clip position | Poor electrical contact |
| Wrong rail compatibility | Unstable bonding connection |
| Improper fastening | Reduced mechanical reliability |
| Surface contamination | Higher contact resistance |
| Wrong material selection | Corrosion risk |
Quick Answer: How Do You Install a Solar Grounding Clip?
A solar grounding clip is installed between the PV module frame and mounting rail to create electrical bonding.
The basic procedure includes:
- Select compatible grounding clip
- Position clip on rail
- Install PV module
- Secure module clamps
- Connect grounding conductor through earthing lug
- Verify electrical continuity
2. Solar Grounding Clip Installation Requirements Before Starting
Before installation, EPC contractors should confirm that the grounding clip matches the PV mounting system.
2.1 Check Module Frame Compatibility
Verify:
- Solar module frame thickness
- Aluminum frame design
- Grounding clip tooth structure
- Manufacturer compatibility requirements
The grounding clip must create reliable contact with the conductive aluminum frame.
2.2 Confirm Mounting Rail Compatibility
Different solar rails have different:
- Cross-section dimensions
- Material thickness
- Surface treatment
- Structural designs
A grounding clip designed for one rail profile may not be suitable for another.
Selection should consider:
| Parameter | Requirement |
|---|---|
| Rail profile | Compatible with grounding clip design |
| Rail material | Suitable for electrical bonding |
| Installation method | Match mounting structure |
2.3 Select Correct Material
Professional solar grounding clips are commonly manufactured from:
SUS304 Stainless Steel
because grounding clips require:
- Résistance à la corrosion
- Stable spring performance
- Long-term mechanical contact pressure
- Outdoor durability
3. Step-by-Step Solar Grounding Clip Installation Procedure
Tools Required for Solar Grounding Clip Installation
| Tool | Purpose |
|---|---|
| Torque wrench | Ensure correct fastening force |
| Multimeter | Verify electrical continuity |
| Visual inspection tools | Check installation condition |
| Compatible fasteners | Maintain mechanical connection |
Step 1: Prepare PV Mounting Components
Before installation, prepare:
- PV modules
- Mounting rails
- Solar grounding clips
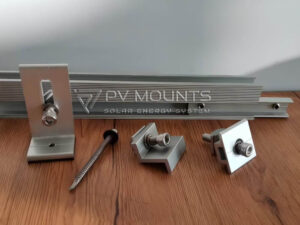
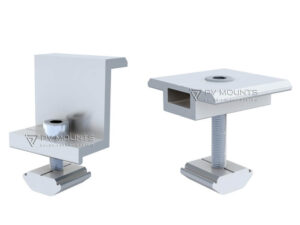
- Mid clamps
- End clamps
- Earthing lugs
- Grounding conductors
Confirm all components are compatible with the PV mounting system.
Step 2: Position the Solar Grounding Clip on the Rail
Install the grounding clip at the designed bonding location.
The clip should be positioned:
- Between PV module frame and mounting rail
- At the designated module connection point
- According to mounting system instructions
The grounding teeth should contact the conductive surface properly.
Step 3: Install PV Module on the Rail
Place the solar module onto the mounting rail.
During installation:
- Ensure the module frame contacts the grounding clip
- Confirm the clip remains correctly positioned
- Avoid movement or displacement during fastening
The grounding clip creates the electrical connection between:
PV Module Frame
        ↓
Solar Grounding Clip
        ↓
Mounting Rail
Step 4: Secure the Module with Clamps
Install:
- Mid clamps
- End clamps
according to the mounting system design.
Correct fastening ensures:
Long-term PV performance
Mechanical stability
Reliable electrical contact
Step 5: Install Earthing Lug and Grounding Conductor
After module-to-rail bonding is established, connect the grounding conductor through an earthing lug.
Typical structure:
Mounting Rail

↓

Earthing Lug

↓

Grounding Cable

↓

Grounding System
The earthing lug usually consists of:
| Component | Matériau |
|---|---|
| Lug Body | Aluminum Alloy |
| Fastener | SUS304 Stainless Steel |
Step 6: Verify Grounding Connection
After installation, check:
Mechanical Inspection
Confirm:
✔ Grounding clip is correctly positioned
✔ Fasteners are properly tightened
✔ Components are not damaged
Electrical Inspection
Verify:
✔ Electrical continuity
✔ Correct bonding pathway
✔ Proper connection between components
4. Common Solar Grounding Clip Installation Mistakes
Mistake 1: Installing Grounding Clips in the Wrong Position
Problem:
The grounding clip does not properly contact the module frame or rail.
Result:
Poor electrical bonding.
Solution:
Install according to the mounting system design.
Mistake 2: Using Incompatible Grounding Clips
Problem:
One grounding clip design is used for different rail profiles.
Result:
Insufficient contact pressure.
Solution:
Select grounding clips according to:
- Rail section
- Module frame
- Mounting structure
Mistake 3: Installing on Contaminated Surfaces
Possible contaminants:
- Paint
- Dirt
- Oxidation
- Coatings
These may affect electrical contact.
Correct practice:
Ensure proper contact surfaces according to the manufacturer’s requirements.
Mistake 4: Incorrect Installation Torque
Over-tightening or under-tightening may affect:
| Issue | Impact |
|---|---|
| Loose connection | Reduced stability |
| Excessive force | Component damage |
| Incorrect fastening | Long-term reliability issues |
Follow manufacturer installation specifications.
Mistake 5: Confusing Grounding Clips with Earthing Lugs
Grounding clip:
→ Module frame to mounting rail bonding
Earthing lug:
→ Mounting structure to grounding conductor connection
They cannot replace each other.
5. Solar Grounding Clip Installation Best Practices for EPC Projects
Professional EPC contractors usually follow these practices:
| Best Practice | Purpose |
|---|---|
| Use compatible grounding clips | Ensure reliable bonding |
| Select SUS304 stainless steel | Improve corrosion resistance |
| Follow installation specifications | Maintain performance |
| Inspect connections | Prevent installation problems |
| Use qualified suppliers | Ensure product consistency |
PV Grounding Clip Installation Requirements
Professional solar installers should consider:
| Requirement | Purpose |
|---|---|
| Correct clip positioning | Ensure electrical bonding |
| Compatible rail profile | Maintain contact reliability |
| Proper torque control | Avoid loose connections |
| Material compatibility | Reduce corrosion risk |
| Continuity testing | Verify grounding pathway |
6. SUS304 Solar Grounding Clip Engineering Advantages
SUS304 stainless steel is widely used for PV grounding clips because of its balanced mechanical and environmental performance.
| Property | Engineering Benefit |
|---|---|
| Résistance à la corrosion | Suitable for outdoor PV environments |
| Spring elasticity | Maintains contact pressure |
| Mechanical strength | Reliable bonding performance |
| Durabilité | Matches long PV system lifecycle |
For solar grounding clips, stable mechanical pressure is critical because electrical bonding depends on consistent metal-to-metal contact.
7. How EPC Engineers Verify Solar Grounding Installation Quality
Professional EPC teams evaluate:
Component Compatibility
Check:
- Module frame
- Rail design
- Grounding clip specification
Qualité des matériaux
Verify:
- SUS304 grounding clip material
- Compatible aluminum components
- Fastener quality
Installation Condition
Confirm:
- Correct position
- Proper fastening
- Complete grounding pathway
System Testing
Perform:
- Electrical continuity verification
- Visual inspection
- Maintenance documentation
8. PV Mounts Solar Grounding Clip Solution
PV Mounts manufactures photovoltaic grounding components for global solar projects.
Our products include:
| Product | Matériau | Fonction |
|---|---|---|
| Solar Grounding Clip | SUS304 Stainless Steel | Module-to-rail bonding |
| Cosse de mise à la terre | Aluminum Alloy + SUS304 Fastener | Ground conductor connection |
| Grounding Accessories | SUS304 / Aluminum | PV electrical bonding |
PV Mounts supports:
- EPC contractors
- Solar installers
- PV distributors
- Mounting system manufacturers
- Wholesale buyers
with reliable photovoltaic grounding accessories.
9. OEM & Wholesale Solar Grounding Clip Supply
PV Mounts provides:
| Service | Capability |
|---|---|
| OEM Manufacturing | Disponible |
| ODM Development | Disponible |
| Private Label | Disponible |
| Custom Packaging | Disponible |
| Wholesale Supply | Disponible |
| Project Support | Disponible |
For companies sourcing:
- solar grounding clip supplier
- PV grounding accessories manufacturer
- wholesale solar grounding clips
- OEM solar grounding components
PV Mounts provides stable manufacturing support. PV Mounts is a China-based solar grounding clip manufacturer supplying SUS304 photovoltaic grounding components for EPC contractors, solar installers, distributors, and mounting system manufacturers.
10.EPC Procurement Checklist for Solar Grounding Clips
| Evaluation Factor | What EPC Buyers Should Check |
|---|---|
| Matériau | SUS304 stainless steel verification |
| Compatibility | Module frame and rail matching |
| Fabrication | Stamping precision and consistency |
| Contrôle de la qualité | Dimension inspection |
| Supply Ability | Stable bulk production |
| Personnalisation | OEM and private label support |
11.FAQ
A solar grounding clip is installed between the PV module frame and mounting rail to create electrical bonding during module installation.
It should be installed at the designed connection point between the solar module frame and mounting rail.
Most professional PV grounding clips are made from SUS304 stainless steel because of corrosion resistance and stable spring performance.
Non.
Grounding clips bond modules to rails, while earthing lugs connect grounding conductors to the mounting structure.
No.Grounding clips must match the rail profile and mounting system design.
The conductive teeth help establish reliable contact with aluminum module frames and mounting rails.
Normally minimal maintenance is required after correct installation. Routine PV inspections should verify connection condition and corrosion status.
Common causes include:
*Incorrect compatibility
*Improper installation
*Material corrosion
*Damaged components
Yes.SUS304 provides excellent corrosion resistance for many coastal and humid PV applications.
Yes.PV Mounts supplies OEM and wholesale SUS304 solar grounding clips and photovoltaic grounding accessories worldwide.
12.Conclusion
Proper solar grounding clip installation is essential for maintaining electrical bonding and long-term photovoltaic system reliability.
A correct PV bonding procedure requires:
- Selecting compatible grounding clips
- Matching module frames and mounting rails
- Using corrosion-resistant materials
- Following proper installation practices
Solar grounding clips and earthing lugs perform different functions and should be used together as part of a complete PV grounding system.
PV Mounts provides:
- SUS304 stainless steel solar grounding clips
- Aluminum alloy PV earthing lugs with SUS304 fasteners
- Complete photovoltaic grounding accessories
supporting EPC contractors, solar installers, distributors, and PV mounting system manufacturers worldwide.

 French
  English
  Spanish
  Portuguese
  Russian
  Hungarian
  Arabic
  Romanian